If you want to start a blog and learn all about blogging, then you are at the right spot.
Hello, my name is Ritesh Saini. I created my first blog in 2013.
After all these years, all I can say is: Blogging is a stream of countless possibilities!
Blogging gave me a life that I could never get by doing a 9 to 5 job.
Today, I’m my own boss! I make a living online. I can work from wherever I want and whenever I want.
Now the thing is, blogging requires a platform.
In simple words, you can’t blog about something if you have no place to post it. That is where the question arises “How to start a blog?”
Today, I’ll be explaining how you can quickly start a blog, which platform you should choose for your blog, what’s the cost of setting things up, and much more.
7-Step Process to Start a Blog in 2026
- Step 1: Choose your blog’s niche
- Step 2: Choose a domain name for your blog
- Step 3: Choose a blogging platform for your blog
- Step 4: Choose a web host
- Step 5: Set up your blog
- Step 6: Choose a fast-loading conversion-focused theme for your blog
- Step 7: Install recommended plugins on your blog
- Optional Step: Create important pages for your blog
You can click here to scroll down directly to the actual process of starting a blog.
But, if you don’t know why you should start a blog or what a blog can do, then below are some of the legit reasons why everyone in this world (irrespective of their age) should have a blog.
Why do you need to start a blog?

There are tons of reasons, but some of the most obvious and highly popular are as follows:
Get rid of a 9 to 5 job
If you are one of those who is not made for the constraints of a 9 to 5 job, then blogging is the best career you can pursue.
When it comes to blogging, there are no time restrictions. You can blog whenever you want and from wherever you want.
Flexible hours
As mentioned above, there are no time limits for a blogger. Unlike a job where your employer fixes your working hours, here, you are your own boss.
You decide when to work and when not.
Blog from anywhere
You can literally handle your blog even when on a vacation.
All you need is a laptop and a working internet connection, then you can blog from anywhere in the world.
That makes it really convenient for those who love to travel a lot or live in remote locations.
Blog from any device
Yes, that’s right! Gone are the days when you needed a laptop or computer to blog.
Top blogging platforms like WordPress, Blogger, and Tumblr are mobile focussed.
You can find their smartphone or tablet apps in their respective app stores.
So, even if you don’t have a laptop or computer around you and you got an idea all of a sudden, then no worries, take your phone out and start writing.
Become a published author
You don’t really need to write a book to become an author. In this digital era, your blog is your book, and you write your mind on it.
Your blog helps you establish yourself as an author.
Once people know you for your blog, it’s easy to sell a book through it. It’s a win-win situation.
Promote existing business
If you own a business, then a blog can help you target the global audience.
No matter if your business is situated in the basement of some old building in Gotham (a Batman joke), a blog can potentially unlock countless opportunities and leads for your business.
Become your own boss
I’m one of those who can’t take orders from someone while working.
So, I became my own boss. You can pursue blogging as a full-time career.
Don’t worry, you won’t be the only one to do so.
Countless people in this world established their blog and now making a full-time living out of their blogs.
Neil Patel, Darren Rowse, and Pat Flynn are the finest examples.
Now that I’ve explained why you should have your own blog, let’s get started with the process of starting a blog.
Steps to Start a Blog in 2026
Here are some of the easiest steps to start a blog in no time.
Step 1: Choose Your Blog’s Niche

A niche is something that your blog will be all about.
There are multi-niche blogs too on the web, but they require special treatment that I’ll cover in a different article.
Today, I’ll discuss setting up a single-niche blog only. Keep the following points in mind while choosing your niche:
– Explore your interests: Blog about something that you know about. Because when you focus on something you like, then it becomes fun and will never be a burden on you in the long term.
For instance, if you think you are technically skilled or you love tech, then your blog should be about “Technology”
– Use your education: If you are kind of a person who can’t figure out any particular interest to write about, then your education will be helpful.
For instance, if you completed your graduation in Commerce stream, then it’s easy for you to write about “Business and Finance”
– Fulfill the demand: You can choose a niche that is new, and people are urging to know more about it. Or something that’s highly demanded.
For instance, there is a new programming language. Certainly, people are looking for tutorials and every possible detail. If you are familiar with that programming language or you are learning it, then it’s a great thing to start a blog for it.
Note: More than 95% of people who start blogging, quit in a couple of months because of their choice of niche. So, never go with a niche that you’re not interested in or not knowledgeable about. Blogging requires a lot of hard work and patience. If, in the long run, you lose interest in your blog due to its niche, then all the efforts you put into its development, design, and SEO will go in vain.
A profitable niche is a blend of Profit and Passion.
Passion + Profit = Profitable Niche
So, choose a niche that you’re passionate about and can also help you make a profit.
Step 2: Choose a Domain Name For Your Blog

Your domain name is your site’s identity and is unique, just like a phone number. For instance, DigitalKube.com is my site’s domain.
A domain name helps in branding too. It makes your site’s address look authentic and authoritative.
If you have a domain name in mind then you can check its availability using the button given below:
But if you have no idea which domain name or extension you should go with, then let me help you.
- Keep it short: you don’t want to add an entire paragraph to your domain name. I would suggest you keep it under 15-20 characters. The short the domain, the easier it is to remember them
- Make it memorable: your domain name should be easy to say. If they can say it easily, then they can remember it easily as well.
- Use keyword: if possible, use the focus keyword of your blog in the domain. It doesn’t directly help with SEO, but it makes your domain more brandable.
- Avoid numbers and symbols: try to avoid numbers and symbols to your domains. Such domains look less authentic.
- Use TLD extensions: It doesn’t make any difference to your site’s rankings, it’s just TLDs are easy to remember. Make a priority to get a .com domain. If it’s not available, then you can go with .org, .info, or .net.
If you have decided which domain name you want to go with then you can check its availability using the button below:
Note: Make sure you don’t use any trademarked terms in your domain name.
I’ve bought tons of domains in the past and wasted a lot of time and money. My first domain was mashinie.com, that was later redirected to thetrendzjournal.com, and finally to this blog.
And this is just one example, I’ve literally bought a lot of replacement domains for many of my sites over the years because I didn’t like the original ones later.
So, take your time and come up with a domain name that you don’t regret buying later.
Step 3: Choose a Blogging Platform For Your Blog

This step is the most essential as once your blog is ready, switching its platform could be one hell of a difficult. You’ll lose all the design, customizations, and some traffic too.
I started my blogging career with a free blogger blog with no domain. Later on, I bought a domain and moved the site to WordPress. The reason why I did so was “need for flexibility.”
Also Check: Undeniable Reasons Why You Should Have a Blogger (BlogSpot) Blog
Blogger has tons of design and development restrictions. It’s very simple and with no functionalities like a content management system.
WordPress, on the other hand, is a full-fledged CMS. It can become whatever you want it to be. Using WordPress, you can create an eCommerce store, a classifieds site, a personal blog, or even a membership site.
I use WordPress (not WordPress.com) and recommend the same to all my readers.
Keep in mind that there are two kinds of WordPress: Self-hosted (WordPress.org) and Non-Hosted (WordPress.com). I will be talking about self-hosted WordPress in this guide.
So, in my opinion, WordPress is the best choice as a blogging platform from the very beginning because the transition from one platform to another causes harm to your site in many ways.
Once you have decided which blogging platform go want to go with, we can move forward to the next part of this guide.
Step 4: Choose a Web Host

Considering you have chosen WordPress as your blogging platform, you’ll need a hosting server to host your site. A shared server is sufficient for any new or small website. I use and recommend SiteGround.
SiteGround was my host for one year. I jumped from one hosting provider to another in search of the best.
I finally settled for SiteGround. Their quality and support are unmatched. Even some of my current sites are hosted on SiteGround servers.
You can read my in-depth review of SiteGround here. Plus, it has a special SiteGround coupon for all of my readers.
Click the button below to grab a 65% off discount on managed WordPress hosting by SiteGround.
Click on the “Choose Plan” and page will scroll down to all the hosting plans offered by SiteGround.
Note: WordPress Hosting offered by SiteGround is not specific to WordPress only. It simply means that it is highly optimized for WordPress, and you can host other kinds of websites too on it.
You can compare all the plans. Let me help you choose the best hosting plan for you:
- StartUp Plan: this plan is best suited for new websites. The only limitation it has is that you can host only one website on it. If you are not planning on starting more sites in the future, then this plan is your undoubted choice.
- GrowBig Plan: this plan is best suited for growing sites with a good audience size. This plan is the best one in my opinion because not only it’s powerful and able to handle even a tremendous amount of traffic, but you can host an unlimited number of sites as long as you don’t run out of your monthly hosting resource allocation.
- GoGeek Plan: this plan is best suited for established bloggers with multiple sites and an impressive amount of traffic. It is suitable for developers too as it has features like staging so that you can clone your website for development purposes. I won’t recommend you to buy this package in the beginning, but if you are one of those who can’t settle for anything ordinary, then this plan is best for you.
Once, you have chosen the plan, click on “Get Started.” Then it will ask you about registering a new domain.
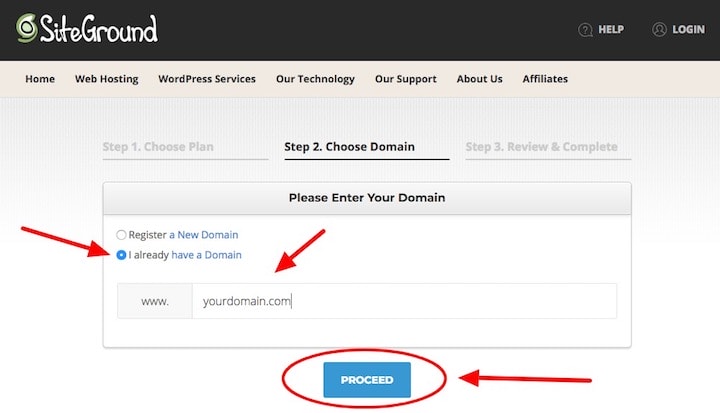
Select “I already have a Domain” and enter the domain that we bought in the previous step. Then click on proceed. A page will open asking you account, payment, and purchase information.
Make sure you fill everything correctly because of any wrong information while checkout may result in serious troubles later. Choose your server’s “Data Center.” It’s the location where your site will get the most traffic from. If your location is not listed, then select the closest to it. A proper data center makes your site load faster.
You can ignore “SG Site Scanner” while placing your order. SiteGround servers are secure even without it as they scan your websites with Sucuri regularly so you can safely ignore it. In case of any malicious code or hacking attempt, you’ll receive an email to fix the problem.
After you click the “Pay Now” button, you’ll receive an email confirmation on the email address you used while making the purchase. It will look something like this:

Now we have all the necessary elements to start a WordPress blog. Let’s move on to the next step of installing WordPress and designing a beautiful site.
Step 5: Set up Your WordPress Blog

You can start setting up a WordPress blog right away. It’s a multi-step process to install WordPress, so I’ll try to explain it thoroughly.
1. Configure Nameservers
We registered both domain and hosting separately. Now it’s time to connect both together. It can be done by configuring the nameserver in your domain registrar’s panel.
Nameservers decide the DNS settings of any domain. By default, your registrar controls your domains’ DNS settings. If we change the Nameservers with your hosting provider’s, then your host will have its control, and you can create any site using it.
I’m using Namechear’s nameserver configuration as an example here. The process is the same for almost every registrar.
Once you are logged in to the Namecheap’s domain management dashboard, click on the “Manage” button beside the domain name.

After that, under the “Nameservers” section, change “Namecheap BasicDNS” to “Custom DNS,” and it will allow you to enter the nameservers provided by SiteGround.
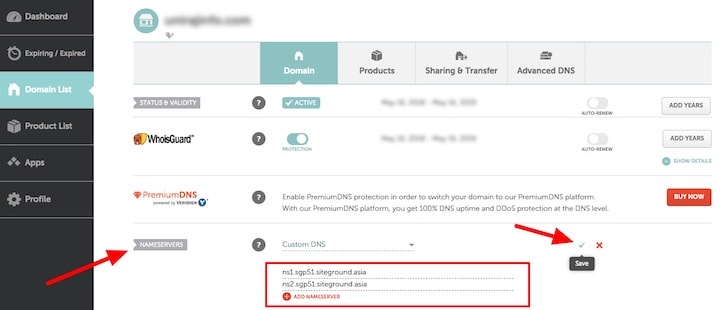
You can find your nameservers in the email received from SiteGround after you signup or in the cPanel. Enter them in the Namecheap dashboard and click “Save.”
This step grants your domain’s DNS authority to SiteGround. That means you can use it in your site now. Let’s move on to the next step.
2. Install Free SSL Certificate
SSL certificate is highly essential for any kind of site. According to Official Google Security Blog, all the sites without an SSL certificate will be marked as “not secure” in Chrome browser. It’s a great step to make the web more secure.
Don’t worry, you don’t need to purchase SSL separately. SiteGround offers unlimited free Let’s Encrypt SSL certificates. You can enable it by logging into to your cPanel and click on “Let’s Encrypt” under “Security” section.
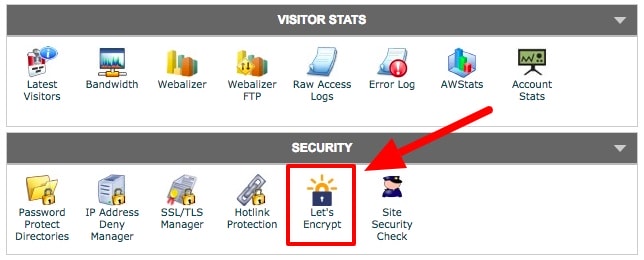
Finally, it will show you to install SSL on your domain. Select the domain then select “Let’s Encrypt SSL” for “Let’s Encrypt SSL Type” and click “Install.”

After that, it will take a few seconds, and your SSL will be installed on your domain. You will see a prompt like this after a successful installation.
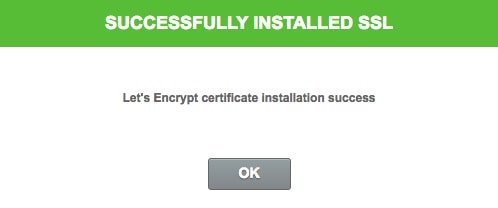
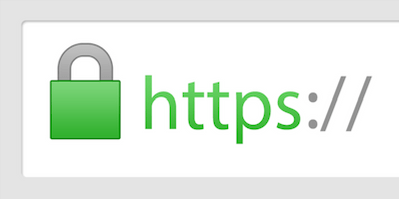
You can verify it by clearing the browser’s cache and then visit the site or open in an incognito tab. You’ll see a green padlock beside your web address with HTTPS written. This is an indication that the SSL certificate has been successfully installed for your site.
Let’s move on to the next step that is the WordPress installation.
3. Install WordPress
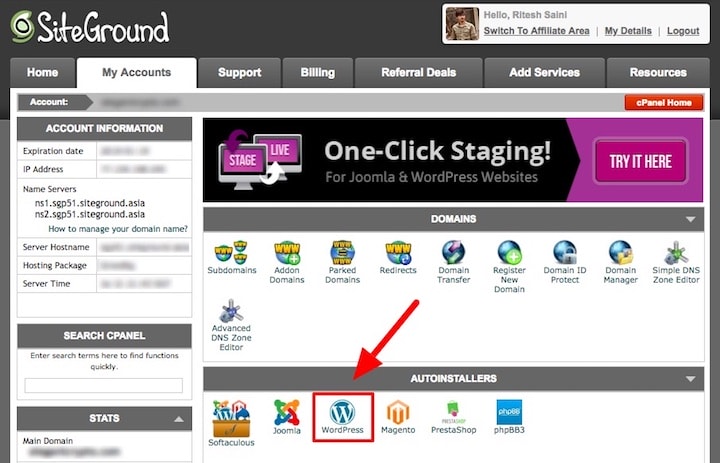
This is the actual step that we have been preparing our site for so far. SiteGround’s cPanel has an automated script installer named Softaculous. It installs hundreds of free available scripts on the web in one install.
Once you are logged into your cPanel, click on “WordPress” under the section “Autoinstallers.”
Now a page will open with details about the latest WordPress, including features, requirements, and other information. Simply click on the “Install” button.
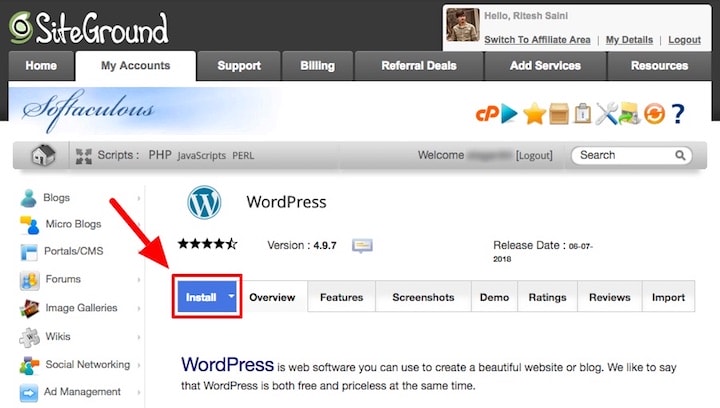
It will show some minor configurations before the final install. Fill all the necessary information about your new site or change the existing ones. Once you’re ready, click on the “Install” button to fire up the WordPress installation process.
It may take up to 3-4 minutes to complete the installation of your new site. Don’t close the browser tab until it completes. After a successful installation, you’ll see a confirmation message like this:
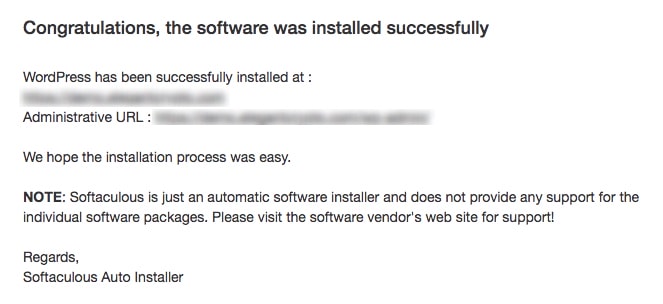
Click on the “Administrative URL” to directly login to your new site’s WordPress Dashboard. This is how it should look:
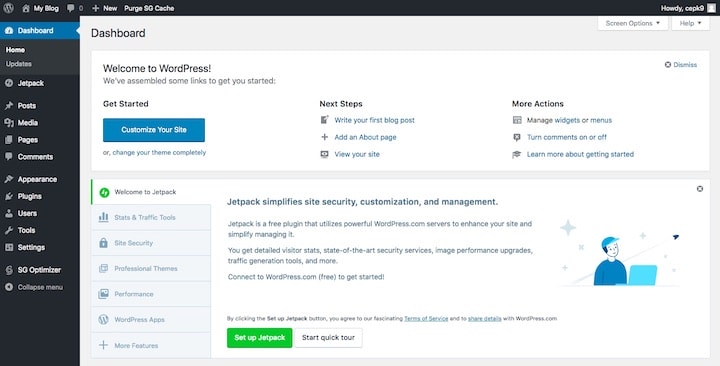
A fresh WordPress installation on SiteGround comes with some plugins and free themes preinstalled. One of those plugins is “SG Optimizer.” It’s SiteGround’s own caching and performance optimization tool which is available exclusively for SiteGround customers only.
Step 6: Choose a fast-loading beautiful theme for your blog

A basic WordPress installation comes with some free themes. Although I always suggest everyone to get a premium theme for their WordPress site.
It’s not a huge investment and pays off in the long-term. For this purpose, I suggest Elegant Themes. I’m using Elegant Themes on most of my sites from years now. Though I use Genesis Framework on this site, I don’t suggest it to the beginners because you need some basic knowledge of PHP hooks and functions to properly design a site using it.
Elegant Themes, on the other hand, is a beginner-friendly solution with beautiful drag-and-drop layouts. Elegant Themes’ signature theme is Divi, which is the most powerful WordPress theme ever made. For blogging sites, Elegant Themes has the Extra theme, which is a publisher focused WordPress theme.
The good thing about Elegant Themes is that you don’t need to purchase individual themes and plugins. Instead, they have membership options: Lifetime and Yearly.
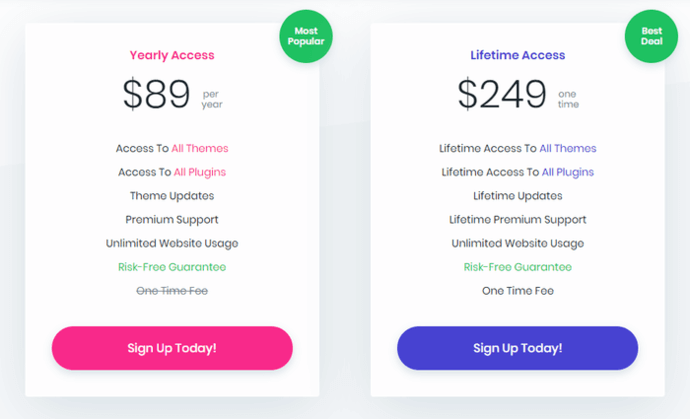
Both plans give you access to all the premium themes and plugins they currently have or will be introduced in the future. Isn’t that good?
Still feel the rates are too high? No worries, I have a special treat for my readers. Check out our exclusive Elegant Themes Coupon and get 20% off premium WordPress themes and plugins.
Check out Elegant Themes Coupon
Step 7: Install recommended plugins on your blog

The core WordPress install is getting stronger and more usable with every update.
Just like they recently introduced native lazy loading for images with WordPress 5.5.
But still, there are lots of features that WordPress lacks.
We can add them using plugins.
So, below is a list of all the essential WordPress plugins that I use on my sites and recommend to new bloggers.
SEO Plugin: RankMath (Free)
![]()
RankMath makes SEO easy for you. I use it on most of my sites.
With RankMath, you don’t need to write any codes or scripts.
It asks you for all the required information about your site and content, then implements them automatically.
RankMath also helps you in on-site SEO when you write your content.
It gives you recommendations that you can follow to improve the quality of your content.
Also, it integrates various schemas like FAQ, Product, etc. that further helps you improve your organic rankings.
RankMath also helps you set link redirections. So, you don’t have to install a separate plugin for that purpose.
The best thing about this plugin is that it is totally FREE of cost. So, why not make the most of it?
Multipurpose Plugin: Jetpack (Free)
![]()
Since the beginning of my blogging journey, there hasn’t been a single site I created where I didn’t install Jetpack.
Jetpack is created by the creators of WordPress to enhance the functionality of a core WordPress install.
It helps you in:
- Securing your site and monitoring downtimes
- Improving site load times using their CDN network
- Managing site and content
- Creating helpful widgets
Speed Optimization & Caching Plugin: WP Rocket (Paid)
![]()
I can’t thank WP Rocket’s team enough for creating this wonderful plugin.
When I started my first WordPress blog, there were only a few caching plugins available in the market.
And all of them required tons of tweaking to get the best result.
WP Rocket is by far the easiest and most powerful WordPress optimization solution.
After installation, setting up WP Rocket takes hardly 5 minutes.
I highly recommend this plugin to beginners.
Free Alternatives: WP Super Cache / W3 Total Cache
Image Optimization Plugin: ShortPixel (Free/Paid)
![]()
Images make an important part of a blog.
If your images are not properly optimized then they will slow down your site’s loading time.
And Google hates sites that are slow.
So, I use and recommend ShortPixel to all my users.
ShortPixel compresses your blog’s images with no compromise in quality.
It also converts them into WebP format for even faster load times.
Use my exclusive ShortPixel coupon to get 50% extra credits for lifetime.
Social Media Plugin: SocialSnap (Paid)
![]()
I use SocialSnap on some of my sites and it is an AWESOME plugin.
Setup is totally beginner-friendly.
Plus, the plugin is so light-weight that it will barely put any stress on your blog’s load time.
The best time about this plugin is that it auto-posts to social media.
That means you won’t have to worry about social media promotion anymore.
Optional Step: Create important pages for your blog
Create a Contact Form Page
Contact forms are a must for any kind of website!
A contact form provides a way for the users to give you feedback or suggestions or contact you for any general query.
Especially for AdSense niche sites, contact form page is highly necessary as AdSense account doesn’t get approved without it!
WordPress doesn’t come with contact forms out of the box. You need to use some 3rd party plugins to add this functionality to your site.
But which contact form plugin to choose?
I recommend WPForms!
WPForms is an all in one solution for anything related to forms. Not only basic contact forms, but it also lets you create signature forms and even help you reduce form abandonment.
You can create a simple contact form in WordPress using the WPForms Lite plugin.
It is free of cost, but you need to buy a WPForms if you want to unlock premium functionalities.
Install the plugin by going to Plugins » Add New page and type “WPForms” in the search box.
Next, install and activate the plugin. Upon successful activation, head over to WPForms » Add New page to create your first form.
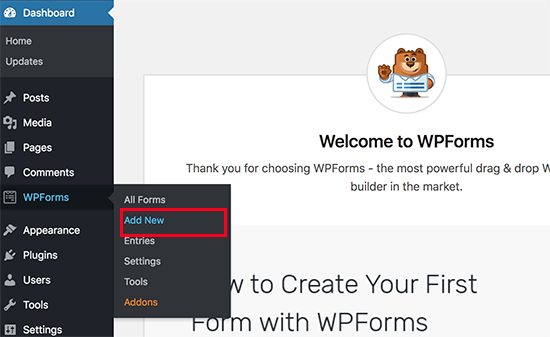
Once you click Add New, the WPForms builder interface will open.
Enter a name for your contact form so that you can recognize it later and then click on ‘Simple Contact Form’ template.
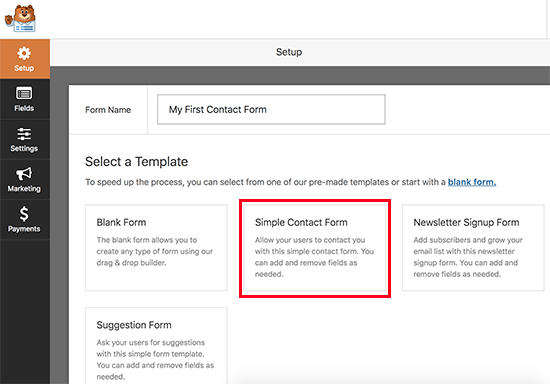
All the WPForms templates have some preselected fields as per the requirements. So, a simple contact form template will add all the required fields.
You can click on any field to change it according to your needs, or add a new field from the left column.
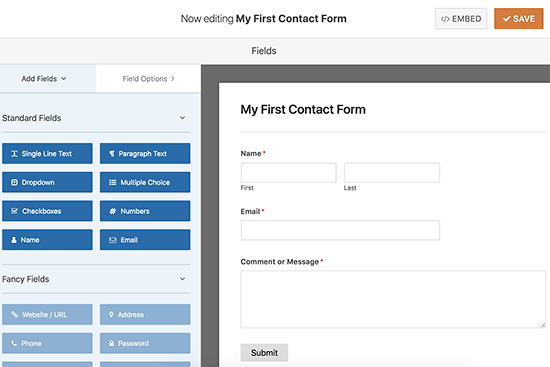
Once your form is ready, click the save button at the top right corner and then exit the form builder.
Now that your form is ready, it is time to create an actual contact form page.
Get FLAT 50% OFF any WPForms plan: Get it today!
Create a new page in WordPress by going to Pages » Add New and call it ‘Contact’ or whatever you like.
On the edit screen, you will notice a new ‘Add Form’ button.
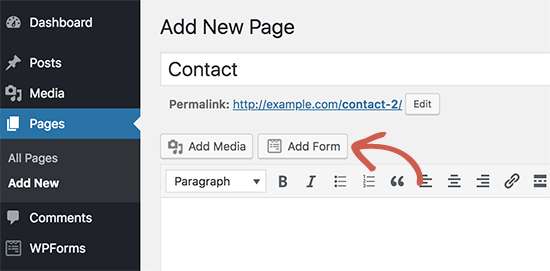
This button helps you to embed your contact forms into your pages with ease. Clicking on it will bring up a popup that shows all the live contact forms available to embed.
Select the one you want and click the add form button.

WPForms will now add the form shortcode into your page. Save and publish the page and visit it using its permalink to see your contact form in action.
Get FLAT 50% OFF any WPForms plan: Get it today!
Final Words
That was all about how to start a blog with WordPress and all the steps associated with it. Now it is on you how you take things further. If you want to learn how to rank your site on Google and other search engines, then check out my SEO tutorials. Also, to learn how to make a living out of your blog online, check out my tutorials for the same.
If you have any thoughts about this tutorial, then feel free to ask in the comments section below. Please don’t forget to share this on your social media handles.


After examining a number of the blog posts on your website now, and I actually like your manner of blogging. I bookmarked it to my bookmark website listing and can be checking again soon.
I love the way you organized everything and explained things simply. Thanks for sharing this useful guide with us.
Hello Abhishek. Thanks for your comment 🙂 I’m glad you liked this article.
Awesome Blog! It’s a great spot to find new information. Thank you so much for this wonderful article
Really good article. Perfectly crafted and deeply analyzed. Thanks a lot! I’ll Surely share with the mates.
Good article and knowledge for me! I found a lot of information here! This article is really good for all newbie here. Thank you for sharing with us!