BunnyCDN is a rare gem! Especially, it is a treat for those who want to start a blog with a restricted budget.
I can’t thank them enough for creating such an affordable yet fast CDN network.
I’ve also written a BunnyCDN review, and I would suggest you to read it.
I use BunnyCDN on DigitalKube, and the performance improvement is just amazing. Plus, my site is hosted with Cloudways, which is a highly affordable cloud VPS.
Today, in this article, I’m sharing how you can set up BunnyCDN with WordPress using WP Rocket.
I will also share the recommended BunnyCDN and WP Rocket settings that I use to achieve faster load times.
Basic BunnyCDN Setup
So, this set up is recommended for most users. There are the least steps involved in the basic setup.
Step 1. Create a Pull Zone
Things to note:
- BunnyCDN is a Pull CDN. That means it pulls and copies all the content from your site and distribute it across the entire CDN network.
- This process is fully automated. You just create a pull zone with an origin address.
- Origin address is where the CDN copies the content from. In this case, your site’s address.
Create a BunnyCDN account if you don’t have it already. You can use my special link below to get a 14-day free trial.
If you already have an account then log in to the BunnyCDN dashboard and click the (+) sign beside Pull Zones.
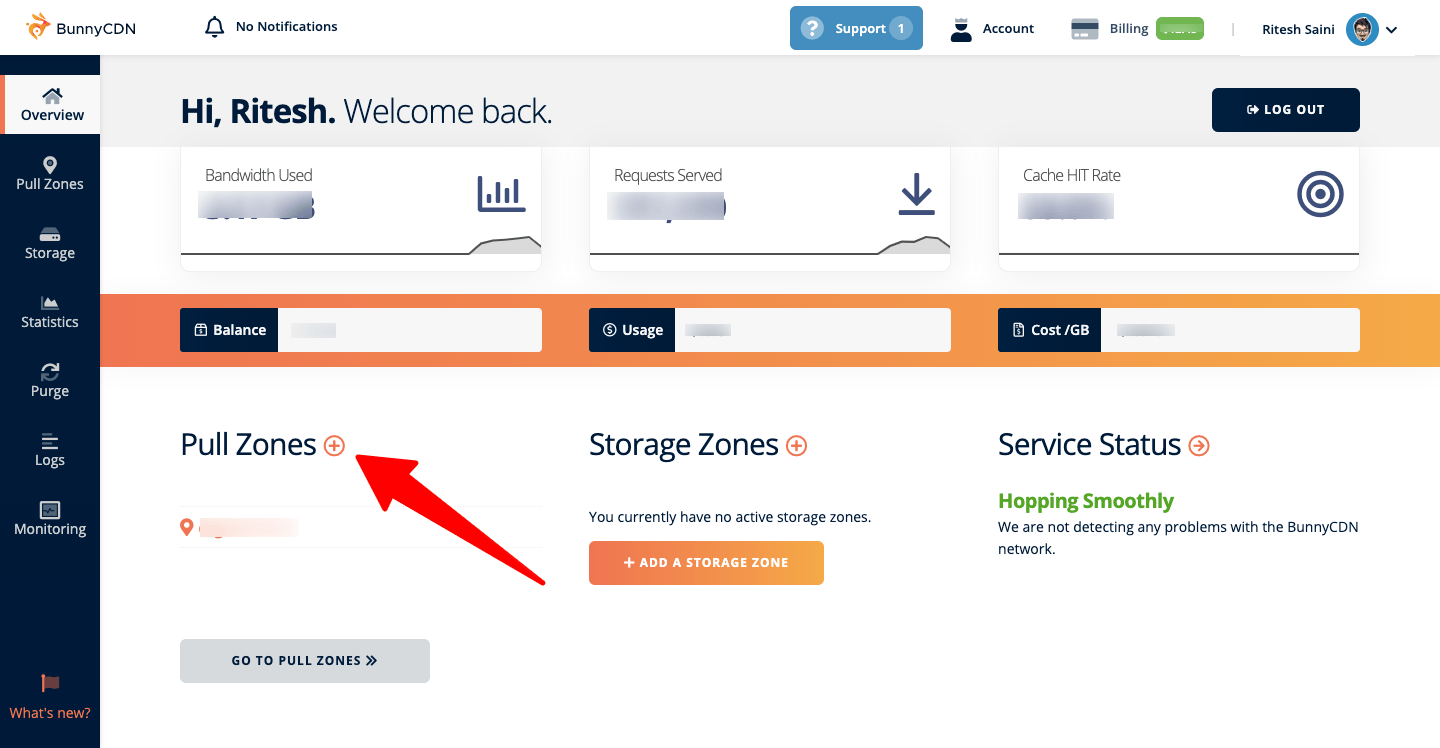
Now, a new Add Pull Zone page will open up.

Add the following details:
- Name: The name of your pull zone is a globally unique name that identifies your zone. BunnyCDN will generate a new hostname for you using it.
- Origin URL: As mentioned above, this is where the CDN pulls the files and content from. In this case, add your site’s address.
- Pricing Zones: These are the zones where your files will be distributed. I suggest you to keep all of them enabled to make your site load faster globally.
Once all three settings are done, click + Add Pull Zone.
You’ll be shown set up instructions. Simply, skip them, and you’ll get your CDN hostname.

Make sure you enable Force SSL if your site uses https.
Step 2. Install WP Rocket Plugin
You can skip this step if you already have the WP Rocket plugin installed and active.
Get WP Rocket plugin. Then install and activate it.
Step 3. Configure WP Rocket
Once the plugin is active, go to Settings » WP Rocket » CDN.
Add the BunnyCDN hostname in the CDN CNAME field. Check the Enable Content Delivery Network box.
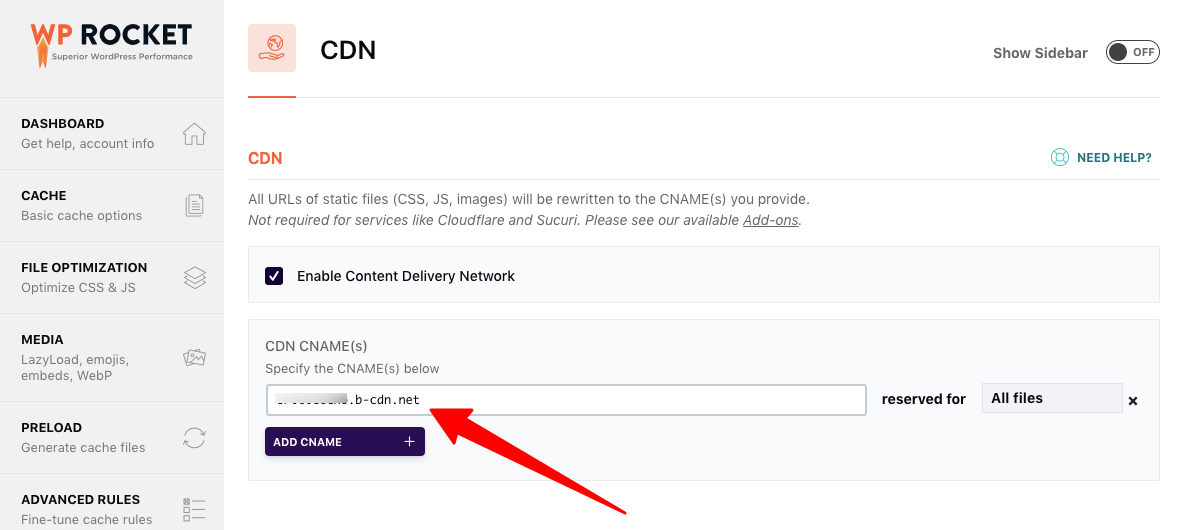
And finally, click Save Changes.
Now, WP Rocket will rewrite the links of your site’s static assets (javascript, CSS, and images) with your BunnyCDN hostname.
Step 4. Test Your Configuration
Congratulations, you’ve successfully configured WP Rocket to work with BunnyCDN on your WordPress website!
To verify, open any post or page of your blog in a Private Browser window or Incognito Mode and go to its page source.
You’ll see the links of static assets have are now overwritten by BunnyCDN hostname.
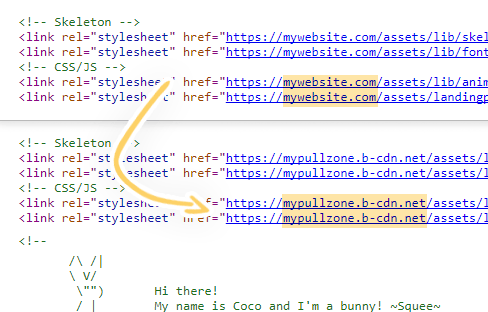
This proves that the CDN is working, and the plugin is configured correctly. In a couple of minutes, your site will start loading way quicker as compared to before.
It can take some time because your site’s data will be cached on BunnyCDN PoPs globally.
With time, your pull zone’s cache hit rate will increase (higher the better).
Advanced BunnyCDN Setup (Brotli Support)
BunnyCDN claims that they support Brotli compression, which can reduce your page’s size even more than Gzip compression.
But if you check your site after basic setup using a Brotli support test tool, then you will get this result:

Did BunnyCDN lie?
Absolutely not! Brotli is applied to your hostname, and all the assets served through it. If you check your BunnyCDN hostname, then you’ll see that Brotli is indeed enabled.

So, to apply Brotli compression to your entire site, you have to serve your whole site through their CDN and not just the static assets.
Below is the step by step process to do that.
Step 1. Modify Pull Zone Origin URL
Go to the Pull Zone and add your hosting server’s IP instead of the domain.

You can contact your web hosting support and ask them for the server IP.
Step 2. Modify DNS Records
Now, this step is a little bit tricky, so pay attention to everything.
You have to point your site’s DNS records to your BunnyCDN’s hostname.
Depending on which site variant you use, i.e. www or non-www, these settings will vary.
Your site’s address will look like either one of the two:
- https://example.com
- https://www.example.com
For non-www variant
So, if your site is using the non-www variant like the first one, then you’ll see an ‘A’ record in your DNS manager that points to your server’s IP.

You may even have an ‘A’ or ‘CNAME’ record for www variant. You don’t need to touch.
What you have to do is to remove this record and add a CNAME flattening record like ANAME. Only a few DNS providers support CNAME flattening.
If you are looking for a free solution, then go for Cloudflare. Make sure you disable Cloudflare DNS and WAF when you use their DNS.
Cloudflare supports CNAME flattening out of the box.
So you can just create a CNAME record and add your site’s domain to the Name and BunnyCDN’s hostname to Target, and you are good to go.
Don’t forget to remove the ‘A’ record before adding the CNAME for the naked domain.

If you are using DNS providers like DNS Made Easy that support ANAME, then you need to add ANAME record instead of CNAME.
For www variant
For sites using www variant, it is fairly easy to configure BunnyCDN’s hostname.
Your DNS must have an ‘A’ or ‘CNAME’ record for www that points to your server’s IP.
![]()
If it is an ‘A’ record, then remove it and add a ‘CNAME’ record for www that points to your BunnyCDN’s hostname.
OR
If it is a ‘CNAME’ record, then it is even easier. Simply edit the Target of the CNAME and replace your server’s IP with BunnyCDN’s hostname.

Step 3. Add Custom BunnyCDN Hostname
Now, add your site’s variant in the custom hostname section of your BunnyCDN Pull Zone settings.

Add any of the two:
- For non-www site: yourdomain.com
- For www site: www.yourdomain.com
Once added, enable SSL and Force SSL.
That’s it! Now wait for a few minutes for everything to propagate globally, and your site will start flying instead of loading 😉
Also, if you test the Brotli support, the result will show that it is supported now.
Step 4. Configure Edge Rules
Now that your site is fully routing through BunnyCDN, you may experience some issues with the login page, dashboard, post previews, and many other parts.
Because BunnyCDN will cache everything, including the things, it shouldn’t.
To stop it from doing so, we will have to add some edge rules.
Go to BunnyCDN Dashboard » Pull Zone » Edge Rules
Here are my pull zone’s edge rules look like:

You can configure them yourself or ask the BunnyCDN support to set them for you.
Recommended BunnyCDN Settings
I am sharing my BunnyCDN settings. You can change them according to your pull zone and site.
In the Caching tab, add the following settings:

File Expiration Time: Override 1 year
1 year is standard. You should set the same.
Turn off Disable Cookies
WordPress sets cookies when you log in. If this option is enabled, you may have login issues.
Turn off Optimize for media files
You don’t need this option until and unless you host and stream large video files on your site.
Vary Cache: Enable URL Query String
This option will treat your post previews and actual posts differently. Turn it on. Leave Browser WebP Support, User Country Code, and Request Hostname disabled.
You can create a ticket in BunnyCDN support if you have any doubts.
In the Security tab, leave everything default.
In the Headers tab, here are my settings:

Enable Add CORS headers
If you use local fonts, then they will definitely break if you disable this option.
Disable Add Canonical Headers (Optional)
If you are using basic BunnyCDN configuration that routes only static files, then enable this option.
If you are using full site caching using the advanced BunnyCDN configuration, then you should disable it. Why?
BunnyCDN will use your Origin URL in canonical headers. In advanced setup, we used the server’s IP address instead of URL in the Origin URL. That means your server’s IP will be added to the canonical header if you turn it on.
Instead, create an edge rule like this one to add canonical headers:

If you are not comfortable setting it up by yourself, then you can ask BunnyCDN support to do it for you.
That is my complete configuration of BunnyCDN. Now let’s move on to configure WP Rocket.
Recommended WP Rocket Settings
Go to Settings » WP Rocket and open the Cache tab.

Tick the checkbox for Enable caching for mobile devices, Separate cache files for mobile devices, and Enable caching for logged-in WordPress users.
By enabling caching for logged-in WordPress users, you can make sure that the caching system is actually working.
In the Cache Lifespan, I’ve added 365 Days so that it matches File Cache Expiration Time in BunnyCDN.
Though, you can leave it to default if you clear the cache regularly.
Save changes and go to the File Optimization tab.

- I left Minify HTML unticked because it was breaking the Elementor plugin.
- Tick Combine Google Fonts files. Make sure it doesn’t break your site.
- I left Remove query strings from static resources unticked because I use a PHP snippet for the same functionality.
- Tick Minify CSS files.
- Leave Combine CSS files unticked. BunnyCDN adds HTTP/2 support to your site that enables the parallel loading of multiple files at once.
- I left Optimize CSS delivery unticked because it was breaking some elements. You can enable it and test your site if it works for you.
- Tick Minify JavaScript files
- I left Combine JavaScript files unticked because of the same reason I left Combine CSS files unticked.
- Tick Load JavaScript deferred and Safe Mode for jQuery (recommended). Test your site after that to make sure everything is working fine.
Save changes and head over to the Media tab.

Tick all the LazyLoad options:
- Enable for images
- Enable for iframes and videos
- Replace YouTube iframe with preview image
I left Disable Emoji and Disable WordPress embeds unticked because I’m using PHP snippets for the same. You can enable then in your case.
I use ShortPixel to serve WebP images. That’s why WP Rocket automatically disabled that option for me.
Get 50% extra credits on ShortPixel using my exclusive ShortPixel coupon.
Save changes and go to the Preload tab.

- Tick Activate Preloading and Activate sitemap-based cache preloading.
- If you are using Yoast sitemap, then a third checkbox Yoast SEO XML sitemap will appear. Tick that too.
- If you have any other sitemaps, then add them to the Sitemaps for preloading text box.
- Add the external URLs that your site loads in the Prefetch DNS Requests section. You can find a list here.
Save changes and go to the Advanced Rules tab.
I don’t use any rules. You can add if you want to use any. Then go to the Database tab.

Tick all the options, including Schedule Automatic Cleanup, and set the duration for a week at least.
Then click Optimize.
No further changes are required in the CDN tab. You have already added your BunnyCDN hostname there.
In the Heartbeat tab, you can control certain behavior of your site so that it doesn’t consume much server resources.
Configure it as per your requirements.
Then go to the Add-ons tab.

- Enable Google Tracking add-on
- Enable Facebook Pixel if you use it
- Leave everything else disabled
Congratulations, you have successfully configured the WP Rocket plugin to boost your site using BunnyCDN.
A word of caution about server-side caching
When I enabled BunnyCDN, my site stayed broken for hours.
BunnyCDN Support checked all the configuration. Still, the site was not loading normally.
Finally, BunnyCDN’s founder Dejan had a look into my case, and he suggested to turn off the Varnish on my hosting server.
I disabled it, and everything started to load normally. According to him:
So, if your host caches your sites using Varnish or Memcached or any other caching mechanism, I would suggest you to check if everything is normal after you enable BunnyCDN or any other CDN.
If your site is broken, then I would suggest you disable those on-site caching systems.
Frequently Asked Questions
Below are some FAQs related to this entire setup. If your question is not mentioned here, then feel free to ask it using the comments section.