Starting an online store is a great way to make money, and there are plenty of options available today.
When it comes to affordability and flexibility, nothing beats WordPress to build eCommerce websites.
In this blog post, I’ll teach you everything you need to know to successfully build an e commerce WordPress website.
From choosing a domain name to writing copy, adding products, and choosing plugins, I have covered everything.
So let’s get started!
List of benefits of using WordPress to build an e commerce store online
WordPress is an open-source content management system that powers millions of websites worldwide and can be used to create any type of website, including eCommerce websites.
It is a popular choice for e-com sites because of its many benefits over other platforms. Some of those benefits are:
Easy to use
One of the main benefits of using WP to build an eCommerce website is that it is easy to use.
Even if you have no prior experience with website development, you can easily create a professional-looking website using WordPress.
Versatile
Another benefit of using WordPress to build an eCommerce site is that it is versatile.
WP can be used to create a wide range of different types of websites, including eCommerce sites, blog websites, business websites, and more.
This means you can have a website with shop and blog both through a single platform.
Wide Range of Features
Another benefit of using WordPress to build an e-commerce website is that it has a wide range of features.
WordPress comes with various built-in features, such as a blogging platform and a commenting system.
In addition, there are thousands of plugins and themes available for WP, which allows you to further extend the functionality of your website.
More Affordable
One more benefit of using WordPress to build an eCommerce site is its affordability.
WordPress is a free and open-source CMS, which means that you can use it to create a website without having to pay for a license.
You just pay for the costs associated with hosting and operating the site. WordPress itself has no fee.
Search Engine Friendly
Another benefit of using WordPress to build an eCommerce website is that it is search engine friendly.
Websites created using WordPress are typically easy to optimize for search engines, such as Google, Bing, and Yahoo.
Huge Community
WordPress is widely used and supported by a large community of developers who actively develop plugins and themes and are available 24/7 to help you customize and improve your website further.
Requirements to build eCommerce site with WordPress
Creating eCommerce website is something that will always be in trend. So, if you’re thinking of starting a store online, now is the time to get started!
What you basically need is a computer and an internet connection. Other than that, below are some necessary prerequisites to build an online eCom store with WordPress:
Domain and web hosting
You will first need a domain name and hosting. This domain will be your site’s identity.
A good domain name should be easy to remember and related to your business.
You can find a suitable domain name by doing some research. Use a tool like LeanDomainSearch if you want some ideas.
The role of your web host is that it will house your entire website.
WordPress and WordPress theme
We will also require WordPress. I will share how to install one if you don’t have a site already.
Then, we need a fast and beautiful WordPress theme that will power your store’s design and functionality.
WooCommerce – eCommerce Store Builder
WooCommerce is undoubtedly the most popular e-commerce site builder and platform for WordPress.
It’s very flexible and easy to set up, making it perfect for new online store owners.
Apart from all the inbuilt features, more features can be added to your WooCommerce store by installing plugins.
Now that all the prerequisites are clear, we can move ahead to the actual steps.
Step 1: Get a Domain Name and Website Hosting
As mentioned above, we will require a domain name which will be the identity of your store, a web host that will house your store, and an SSL certificate.
We are going with Bluehost for this step.
Bluehost is officially recommended by both WordPress and WooCommerce and offers a free domain, free SSL, and free CDN with every hosting plan.
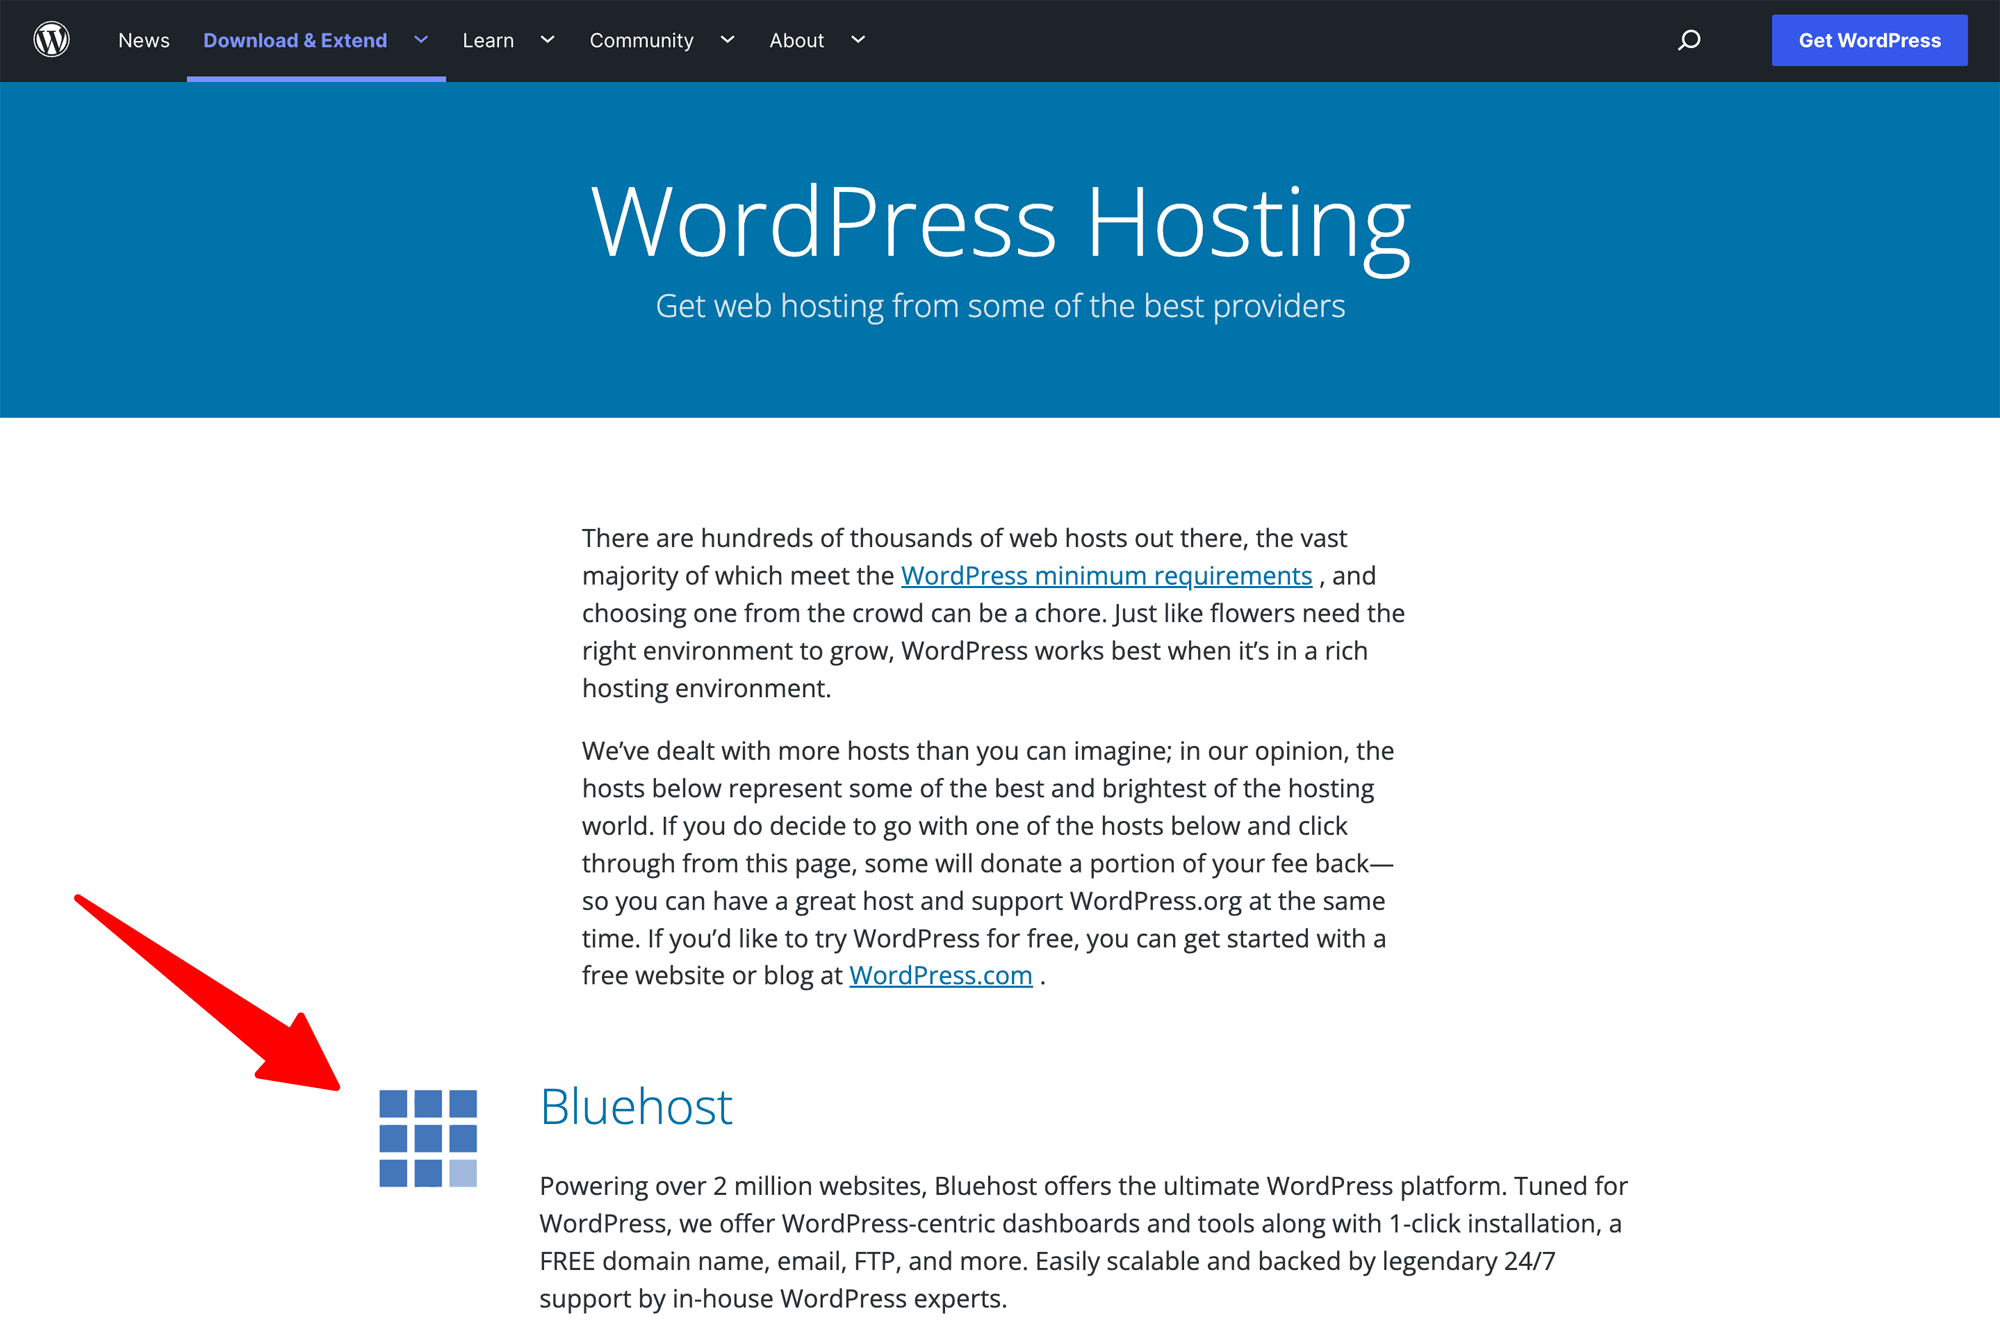
Their one website plan starts at $2.95/mo, which is enough if you’re just starting out.
Bluehost is one of the oldest and most reputed web hosting providers on the web.
Originally founded in 1996 as a single server setup in Matt Heaton’s basement, Bluehost has grown into a powerhouse of a company.
Now, without further ado, let’s go ahead and purchase Bluehost hosting.
Click here to open Bluehost. It should open a page that should look like this:

NOTE: Bluehost auto-changes currency according to the user’s location. Because of that, the page that opens on your end might look different, but the steps involved are more or less the same.
Click the Get Started button, which will take you to the pricing plans.
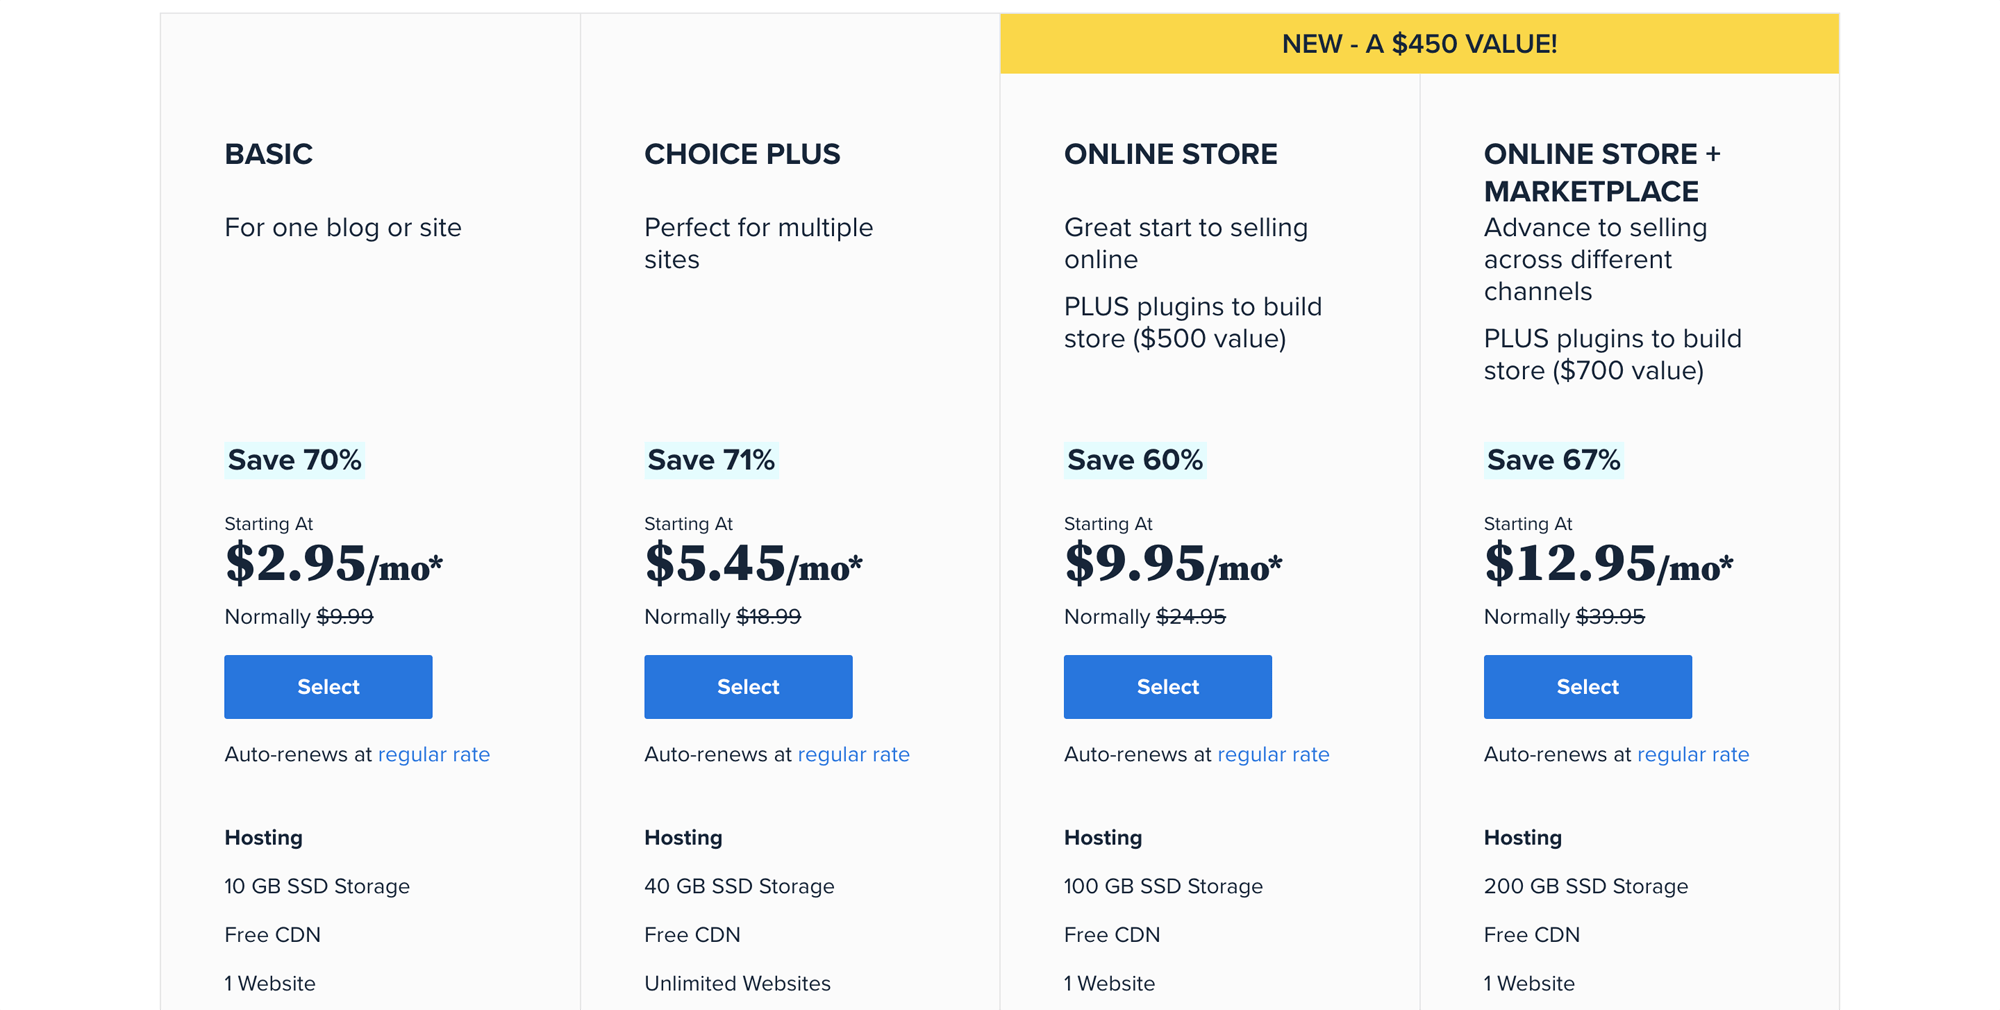
The Choice Plus plan is the most popular one.
Apart from all the features that Basic plan has, Choice Plus comes with Unlimited Websites and Daily Backups.
You can also start with the Basic Plan if you’re just starting out.
Once you select the plan, it will then ask you to select a domain for your store.
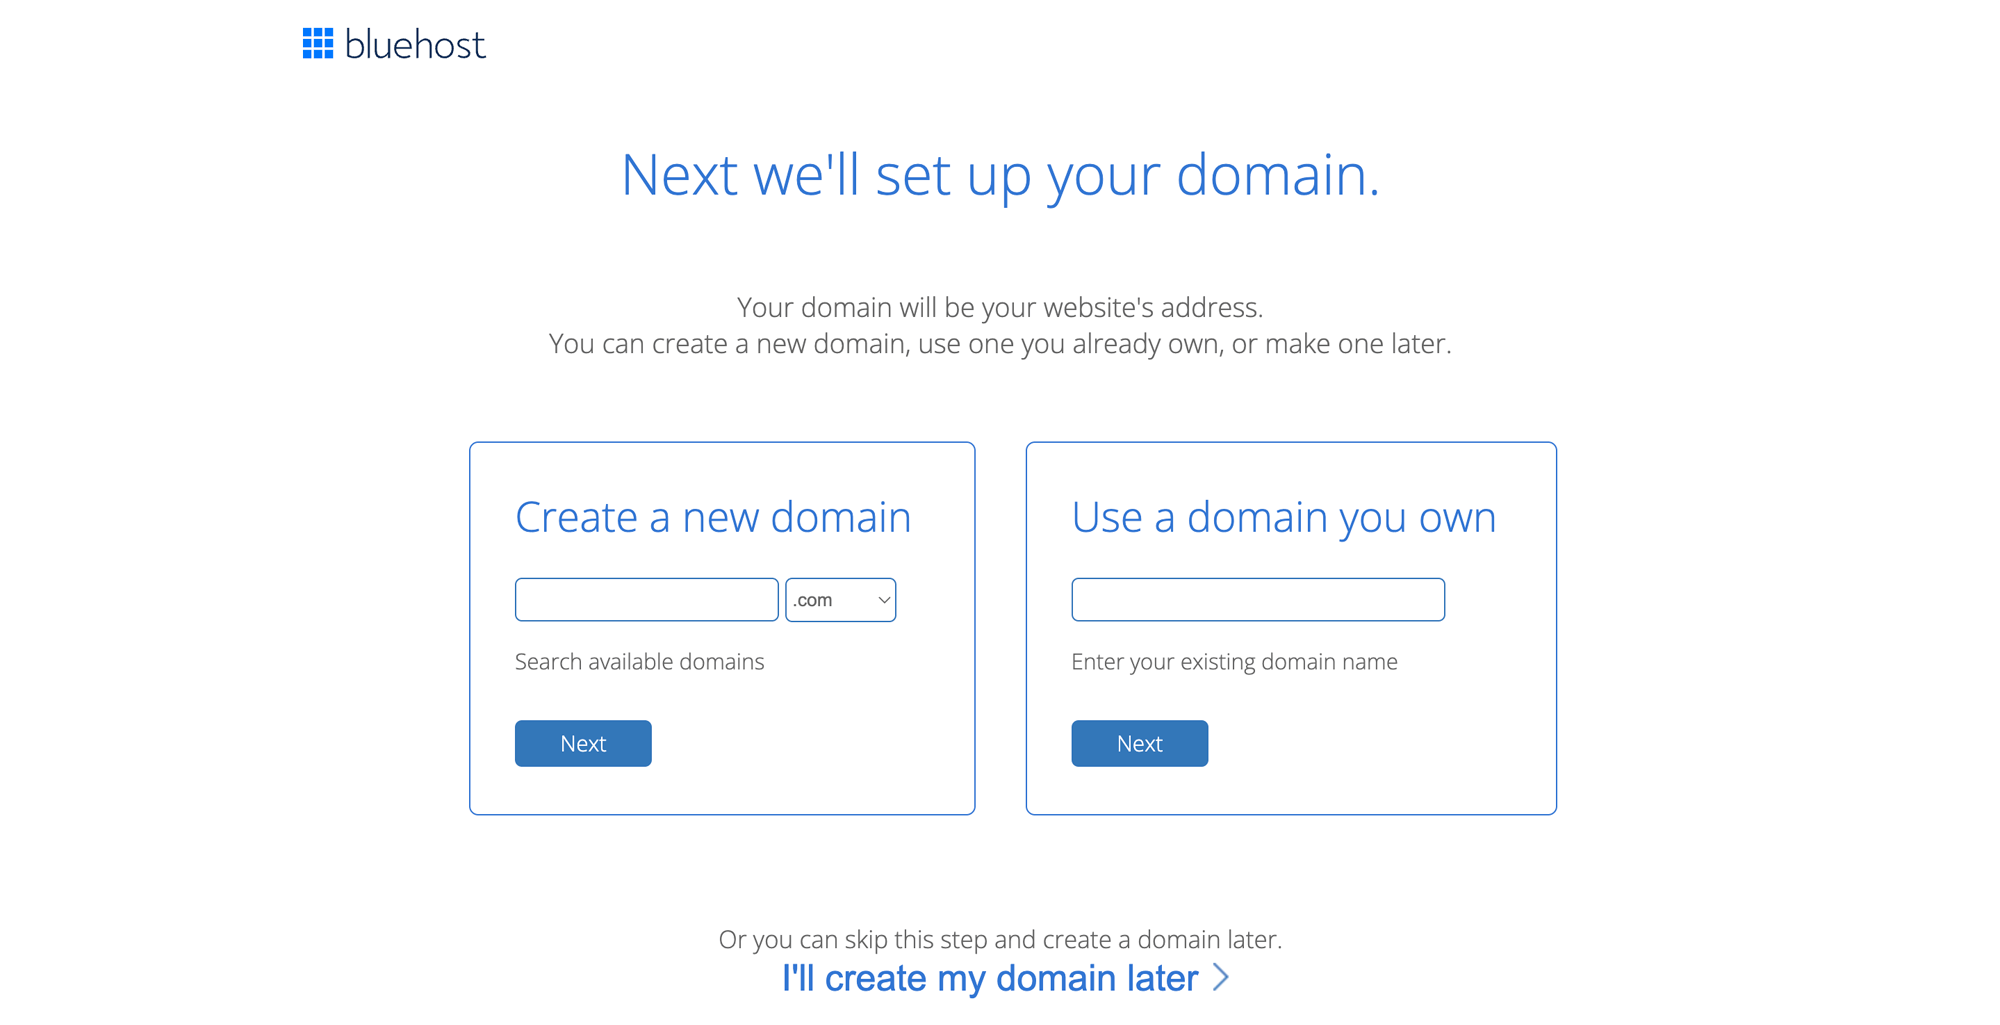
You can register a new domain which comes free with all the Bluehost plans.
Or, if you have an existing domain, you can use it as well.
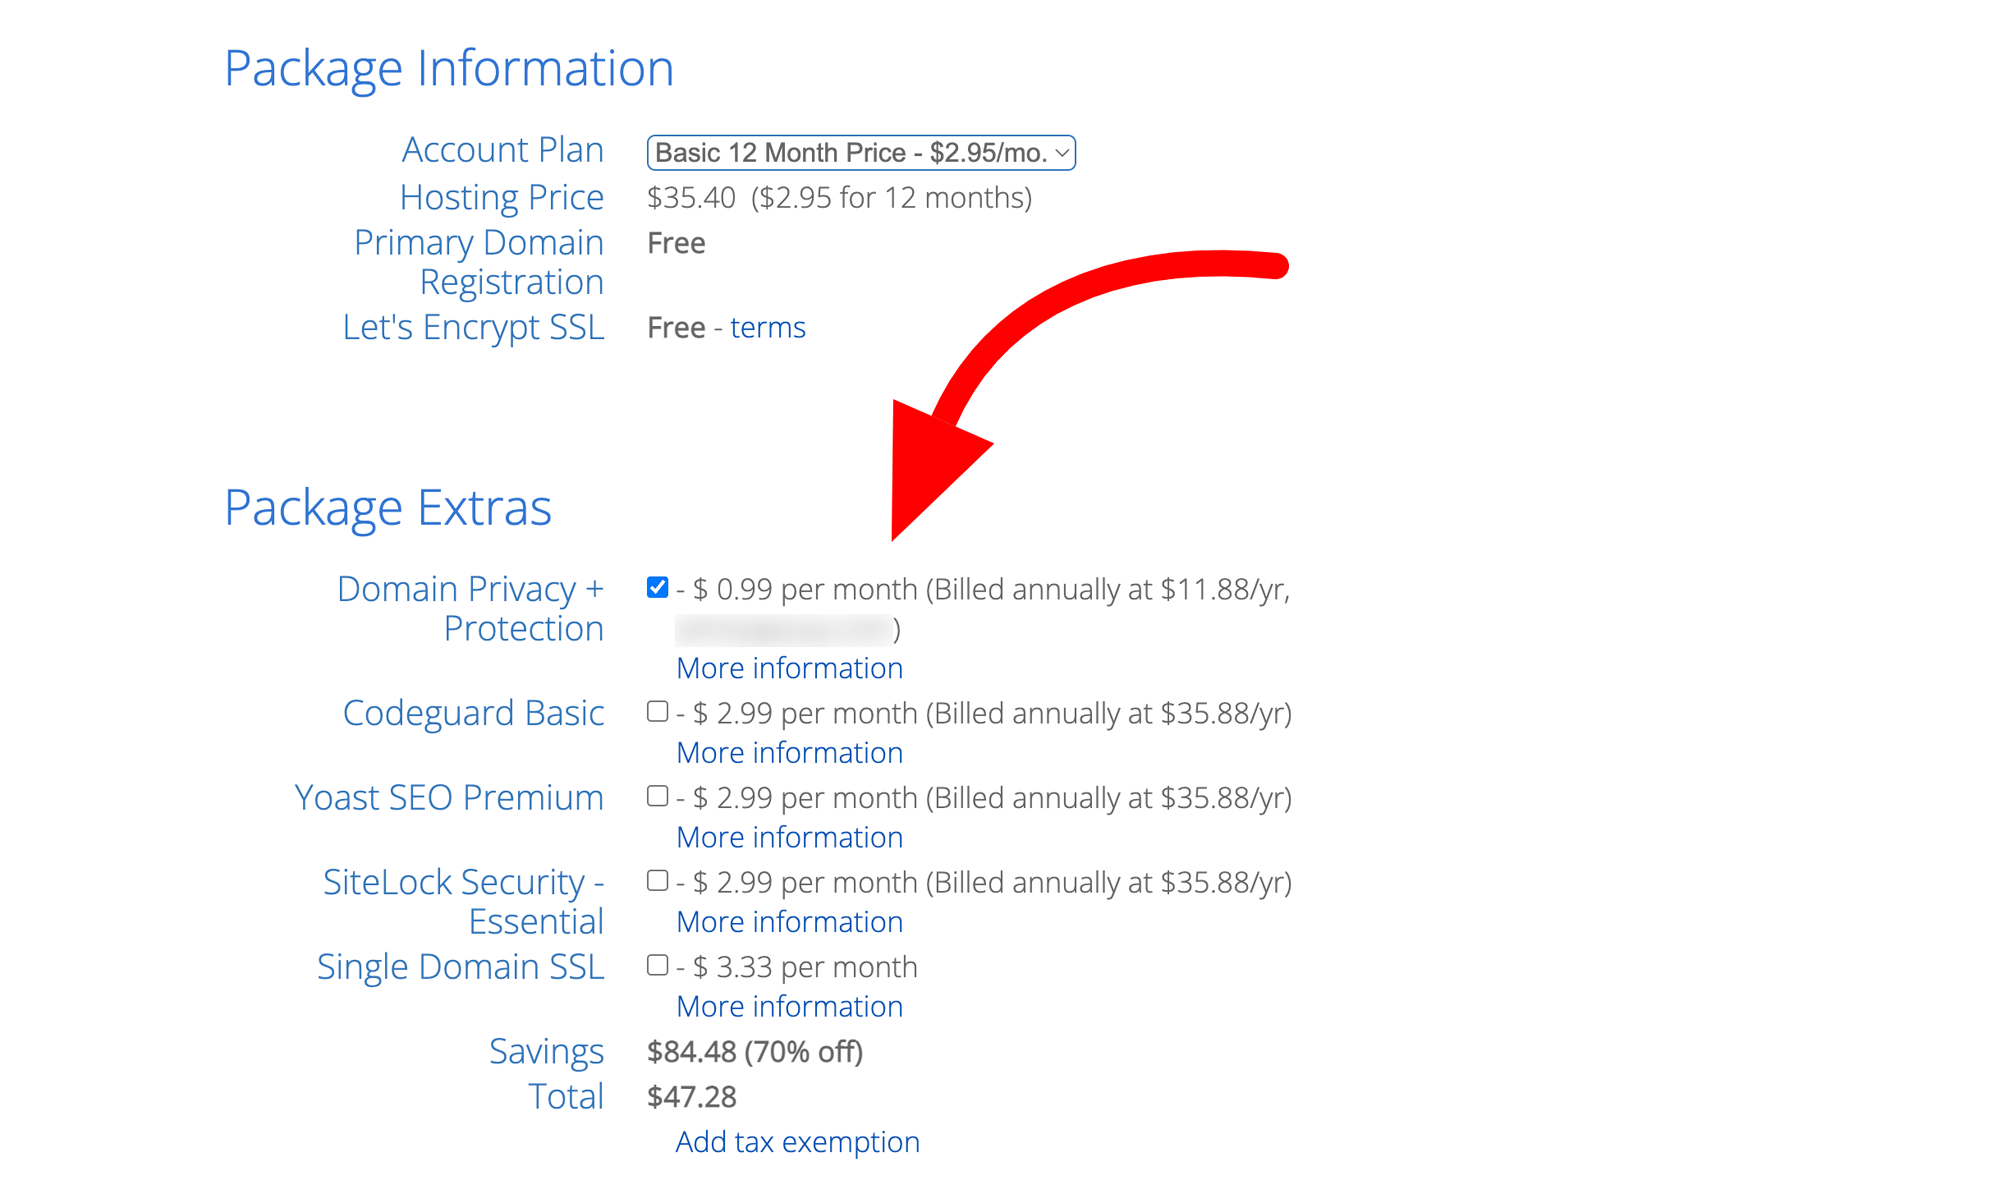
After the domain setup, it will ask you to fill out your account information, package information, package extras, and payment information in the next step.
Make sure the right plan is selected. Also, it’s totally up to you which extras you choose.
Though, I highly recommend the Domain Privacy add-on to keep your info safe from spam and marketing calls.
Finally, it will ask you to fill out your payment details.
After you make the payment, you will receive an email confirmation. You will then be asked to create a Bluehost account.

Fill in all the required details, and boom, your account is ready!
Login to your Bluehost account, and you’ll be asked how much help you need.
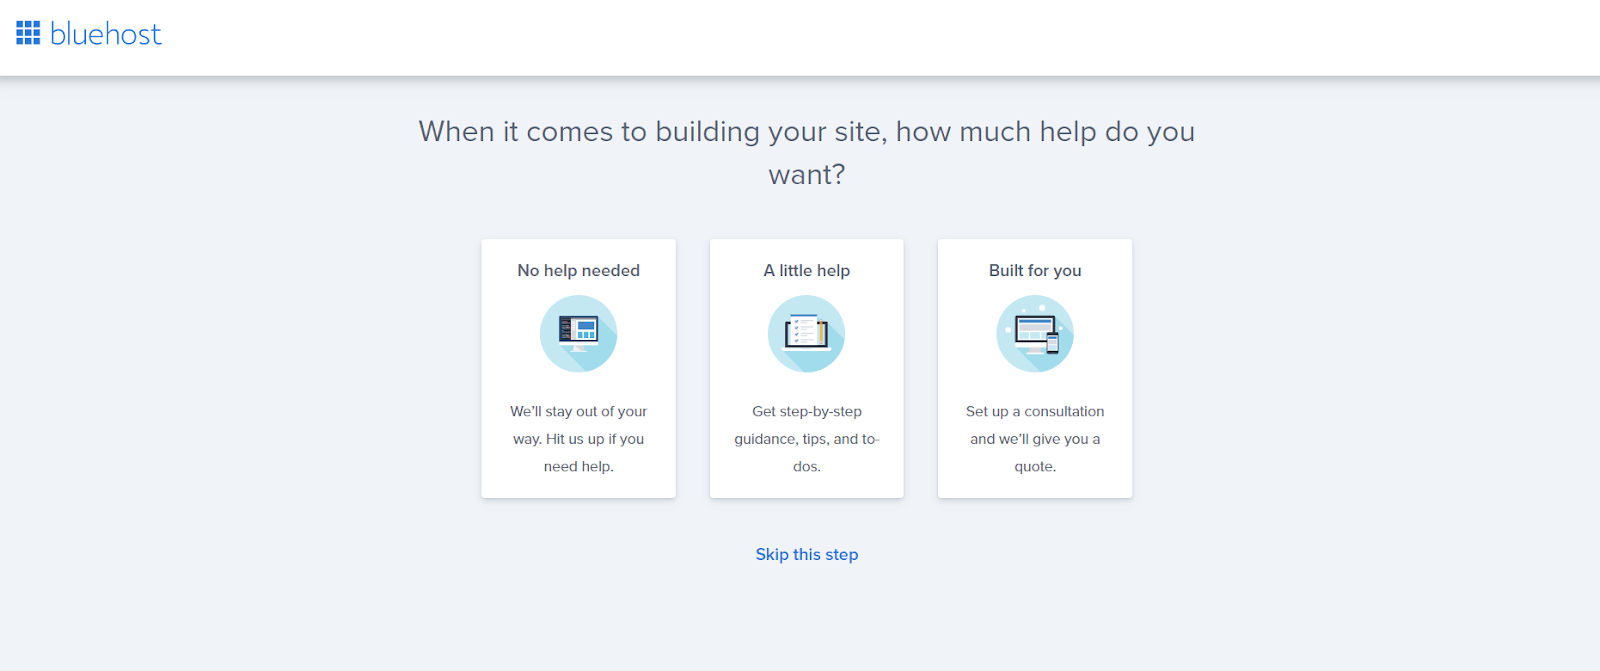
In the first option, you’ll have to set up everything manually.
In the second option, they will walk you through the step-by-step guide to set up your account.
In the third option, they will arrange a consultation with their experts to assist you. (It’s the slowest option)
I chose the second option, which is best for most people.
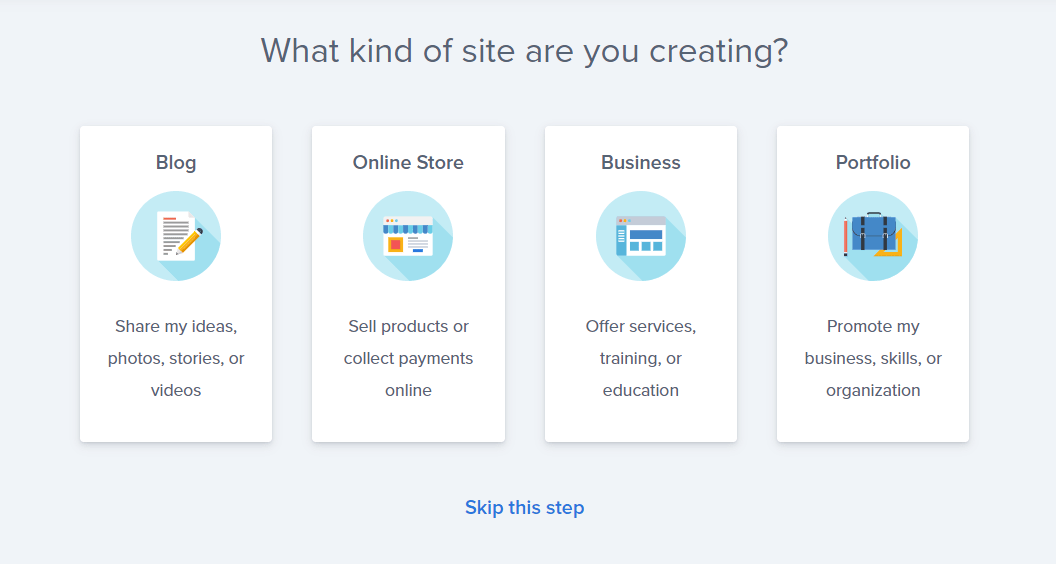
It will then ask you to choose the kind of website you’re creating. You can select one or click Skip this step.
In the next step, Bluehost will ask you if you need a basic WordPress site or their drag-and-drop builder.

The one with Bluehost Website Builder is not a great choice in this case, as we will use an optimized WooCommerce theme to design the site in the upcoming steps.
So, go with the basic option Limitless customization and click Get Started.
Once the setup is complete, you’ll be redirected to Bluehost’s control panel.
The dashboard will show you some recommended steps, which I advise you to skip as we will set up everything as per our needs later.
Click the Log into WordPress button on the top.
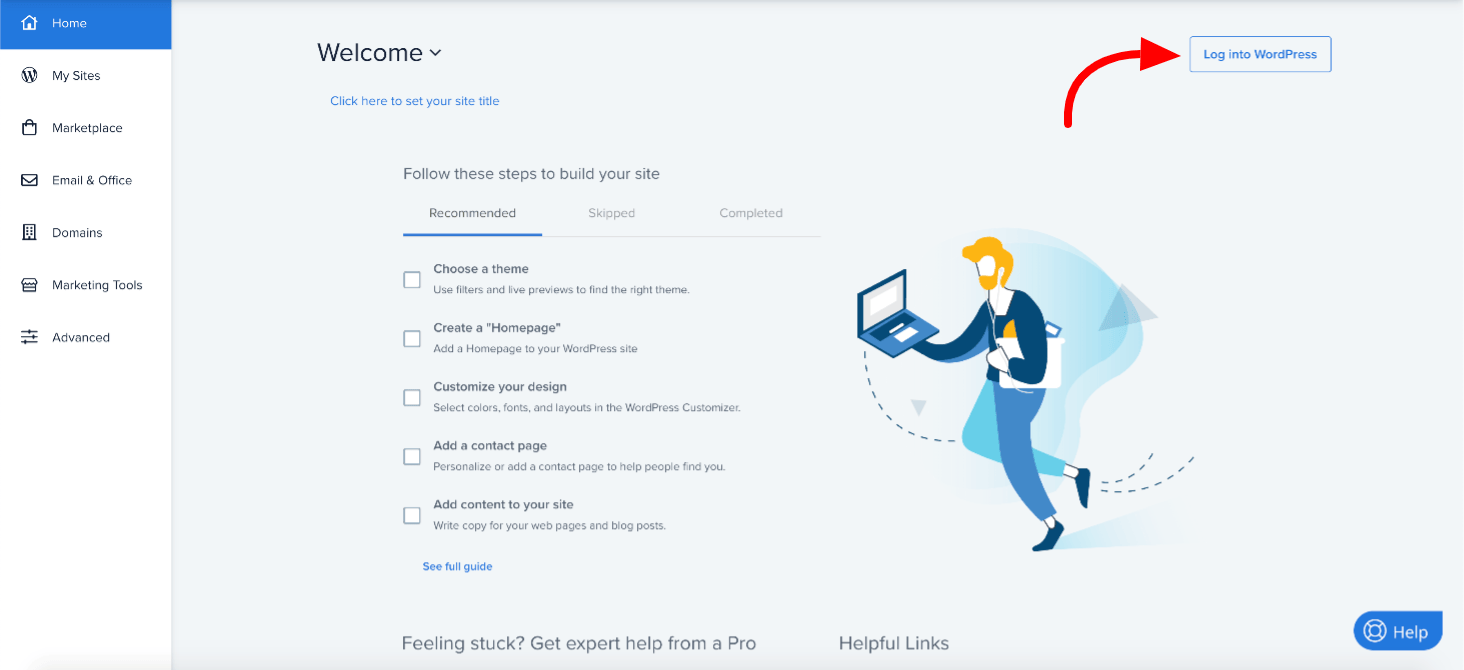
Congrats, your domain, and hosting setup is done!
We will now proceed to set up WordPress in the next step.
Step 2: Setup WordPress
Bluehost will take you to your WordPress dashboard.
It may ask you to set things up for you. Simply ignore it if it does.
I will walk you through all the steps. Go straight to Settings » General.
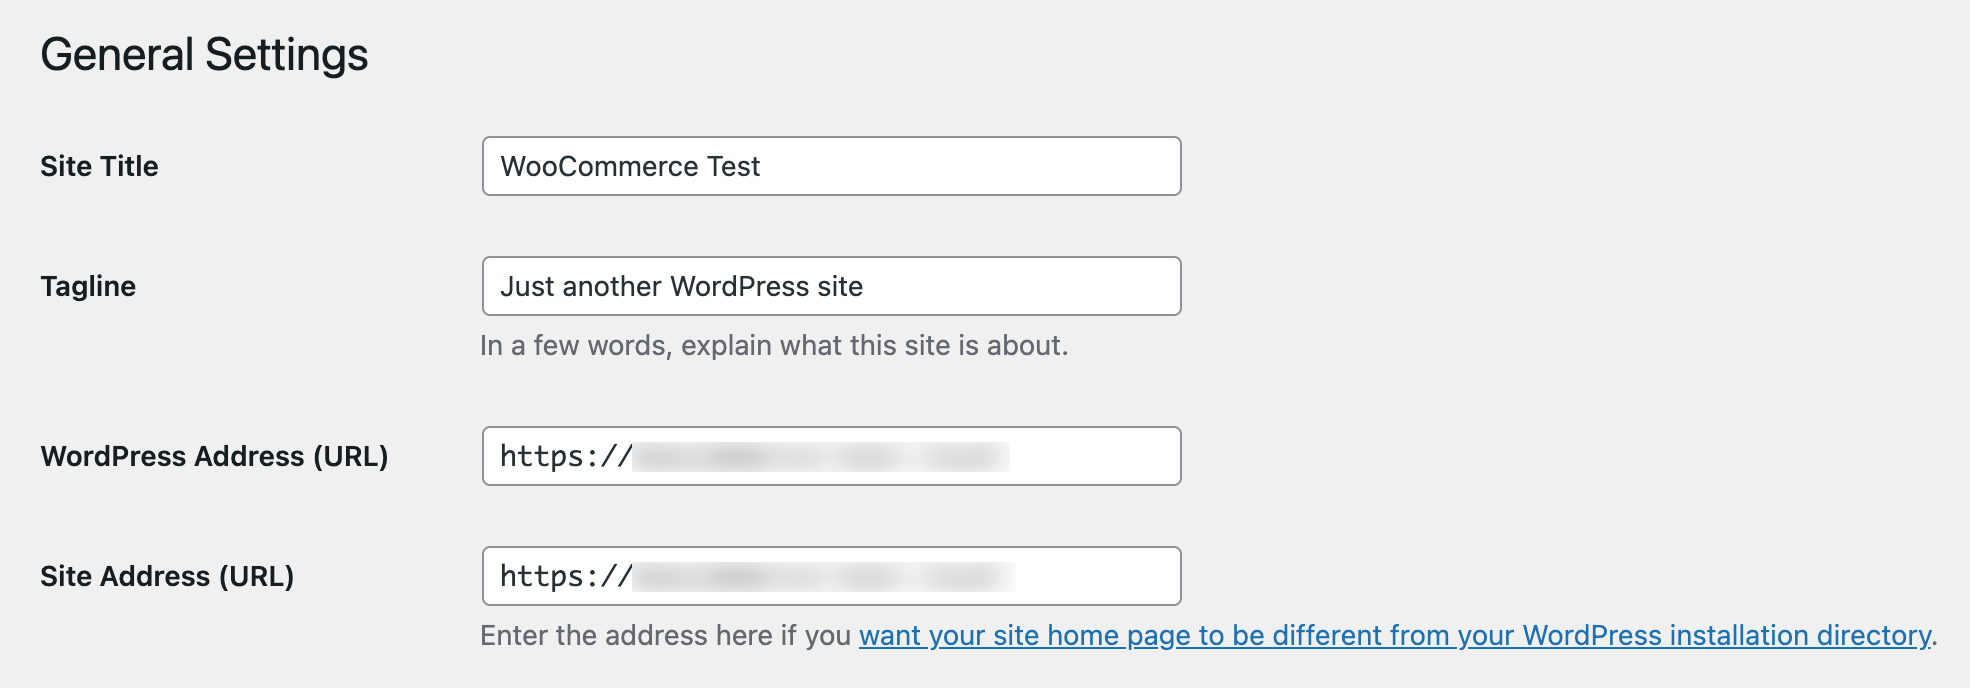
Here, you will set up your store’s name and tagline.
The tagline field is optional, so you can safely leave it empty if you want.
Make use of SSL
We need to configure WordPress to use the free SSL that comes with all the Bluehost plans.
Though it does that automatically, check if the address in the WordPress Address (URL) and Site Address (URL) has HTTP or HTTPS.
If it starts with HTTP, replace it with HTTPS.
Don’t forget to click the Save Changes button at the bottom.
Your WordPress setup is successfully done. We will set up the store in the next step.
Step 3: Install and Setup WooCommerce
WordPress, out of the box, is a blogging platform. But its CMS capabilities make it easy for us to turn it into any kind of site we want.
WooCommerce is a versatile plugin that allows you to turn your WordPress site into an eCommerce store and sell products.
It’s a feature-rich plugin that’s created by the creators of WordPress.
It has tons of options inbuilt, like product categories, customized checkout process, shipping options, and much more.
To get started with WooCommerce, go to Plugins » Add New.
Look for woocommerce and once it shows up, click the Install Now button.

WordPress will automatically download and install WooCommerce on your site.
Once done, it will show you the Activate button. Click on it.
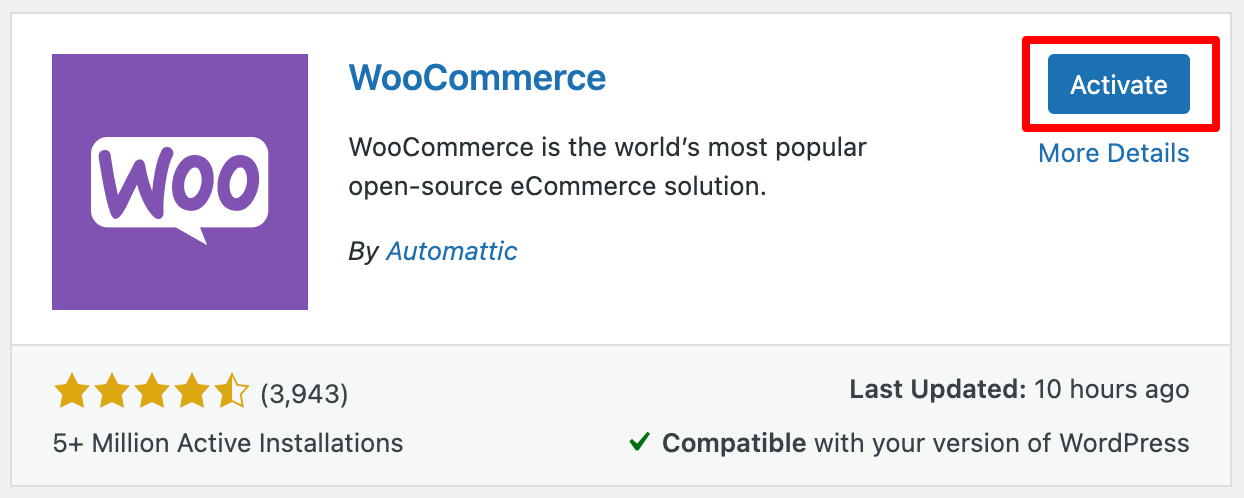
After activation, WooCommerce will take you through a series of steps.
Follow this wizard, and it will configure your store’s settings based on your needs.
Store Details
The first step of the wizard is to fill out store details. Fill out your store’s country and address.
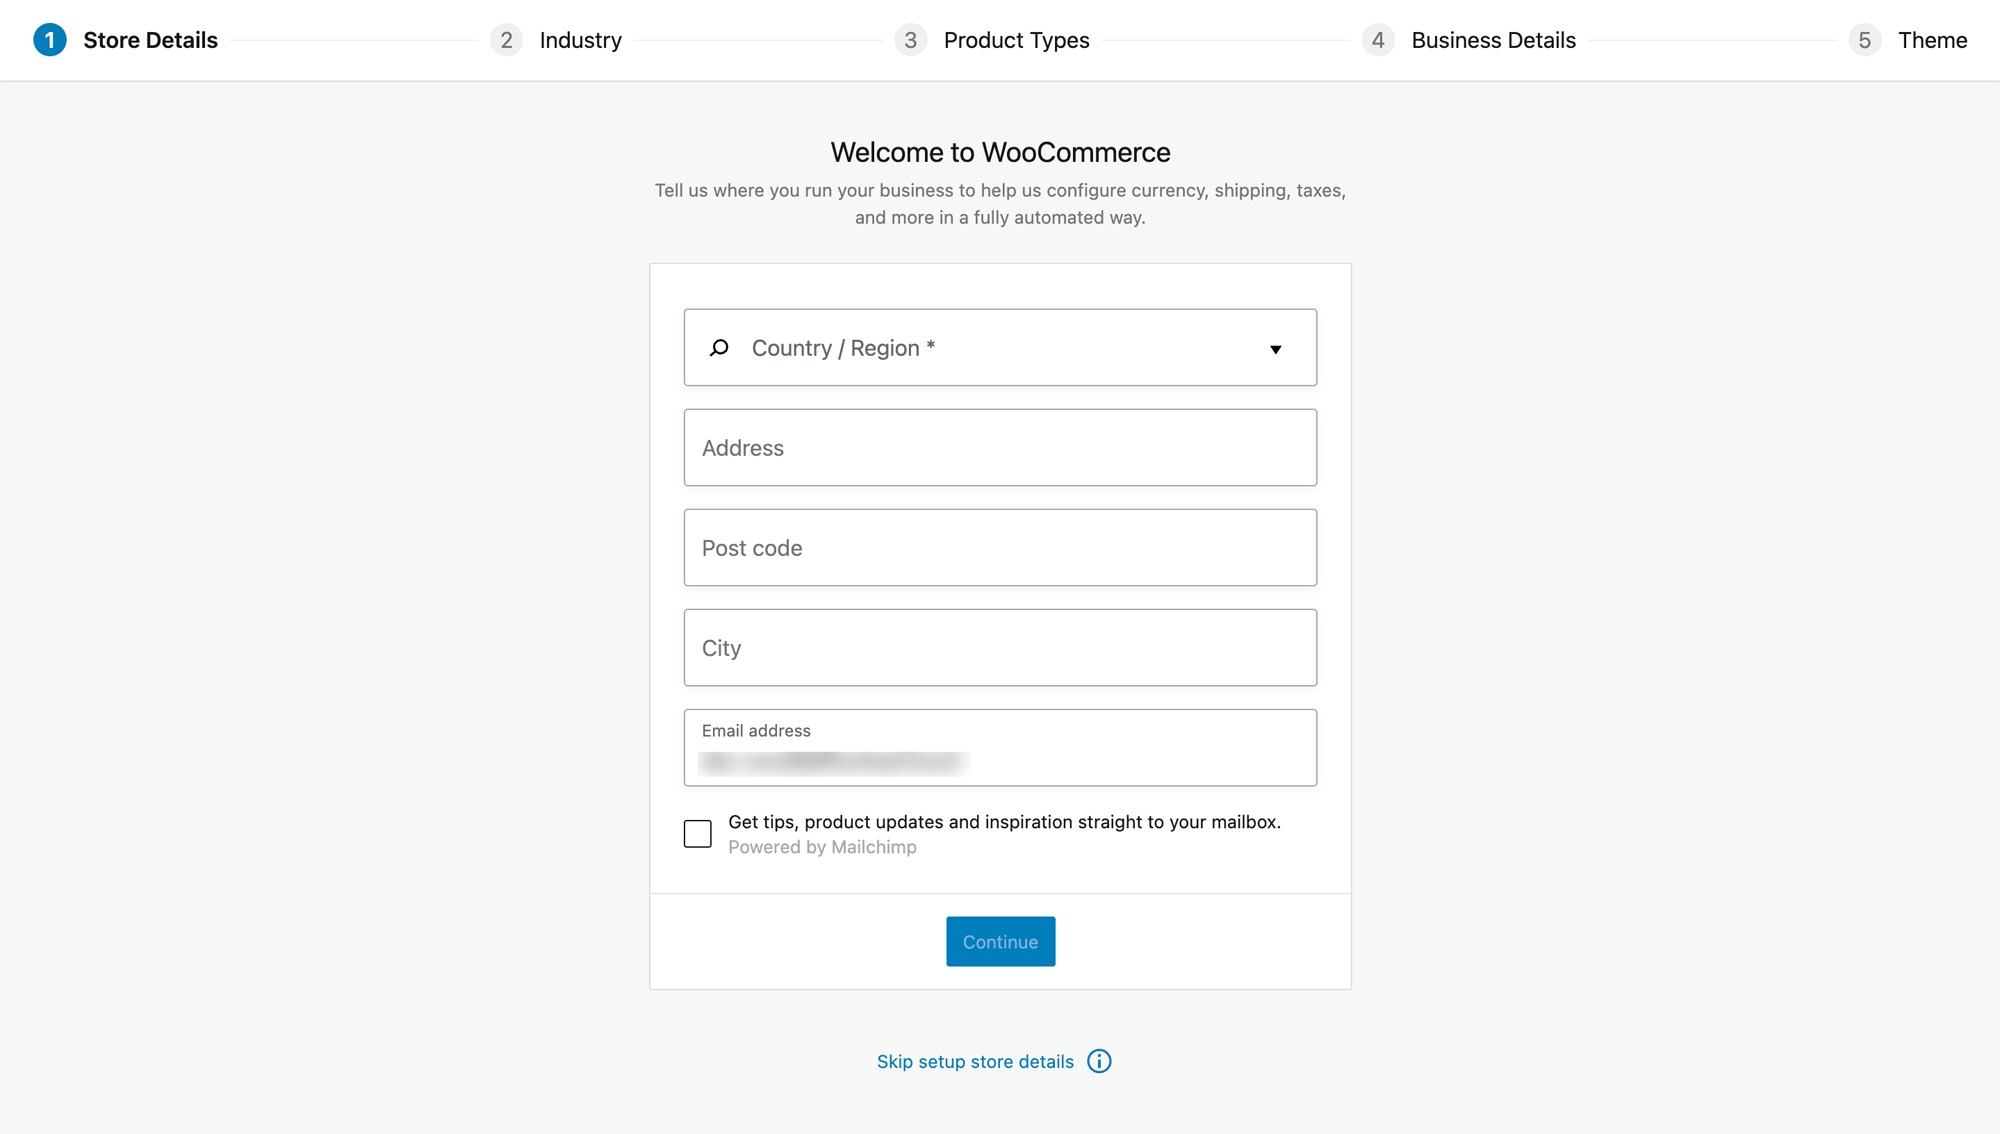
This step will assist WooCommerce in configuring currency, shipping, and tax details. Once filled in, click Continue.
Industry
In the next step, it will ask you about the industry in which your store operates.
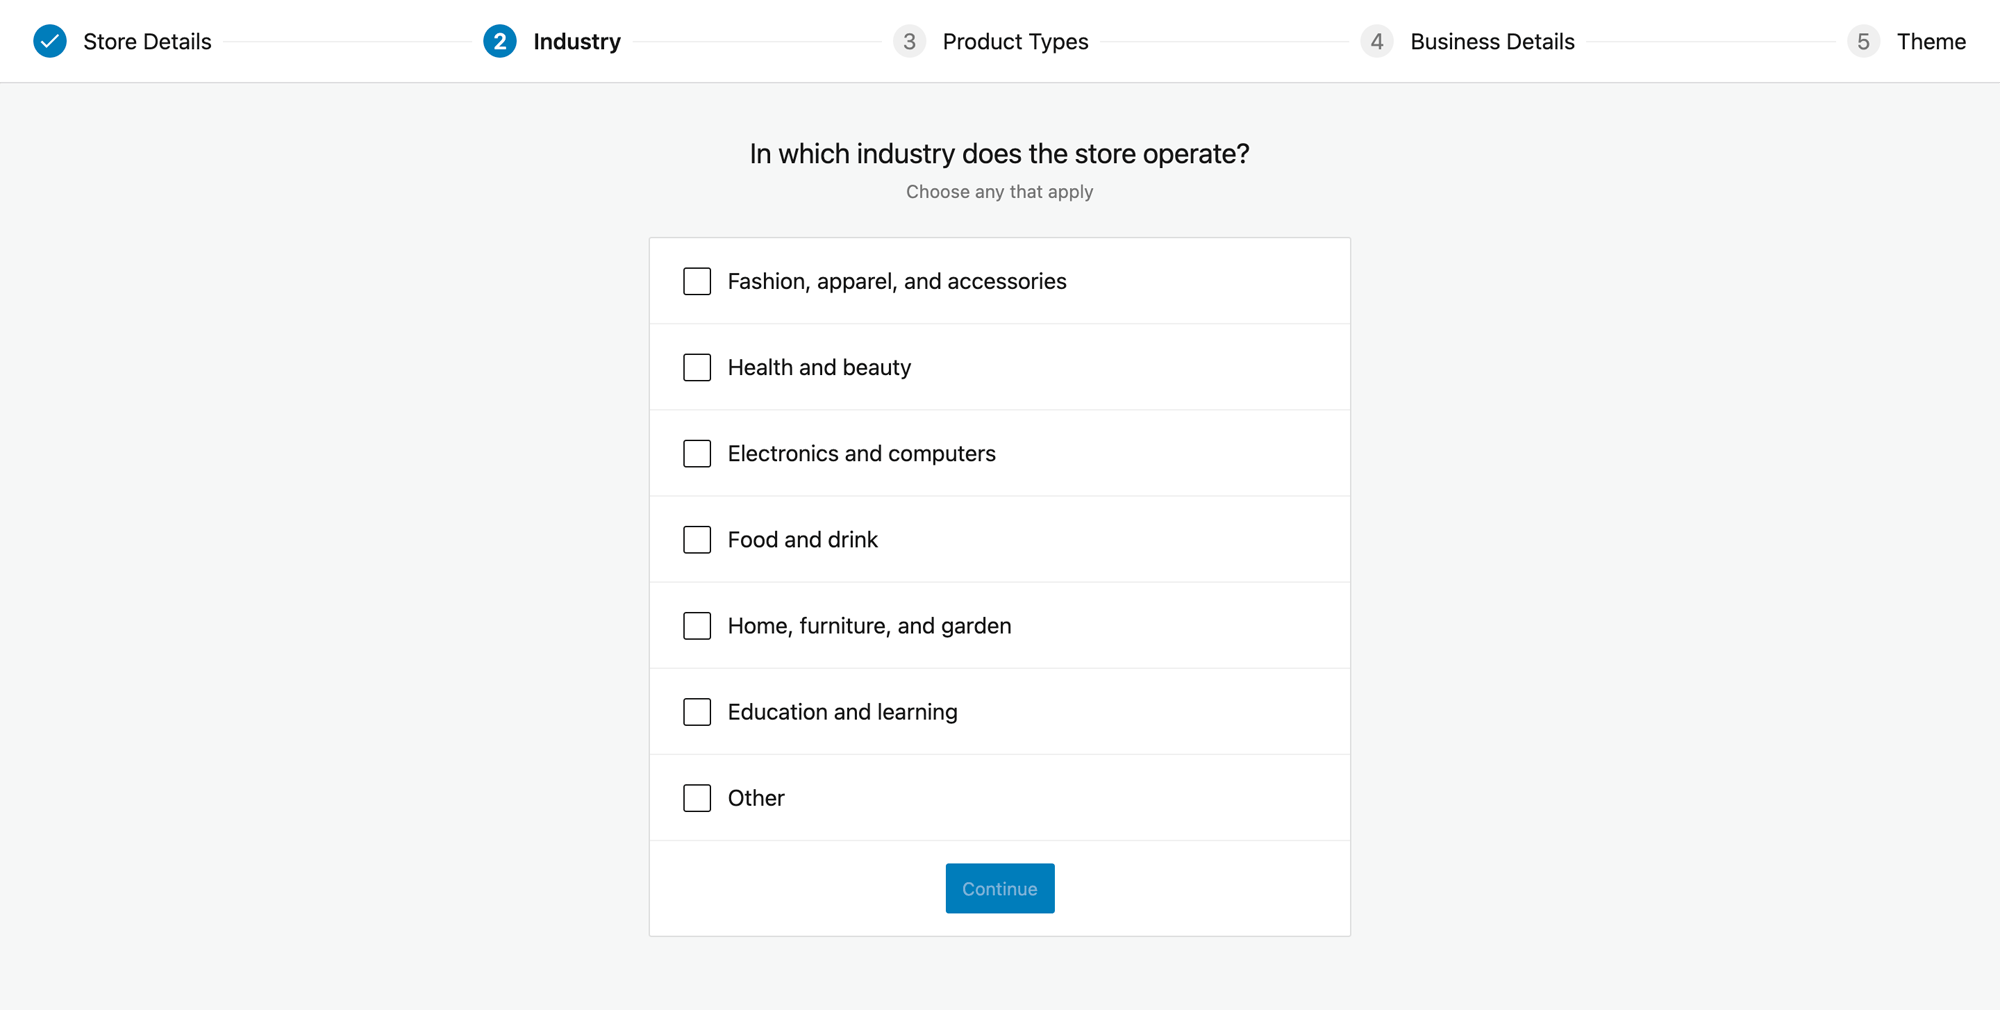
Select the most relevant one(s) and click Continue.
Product Types
The next step will ask you about the product types you’re selling.
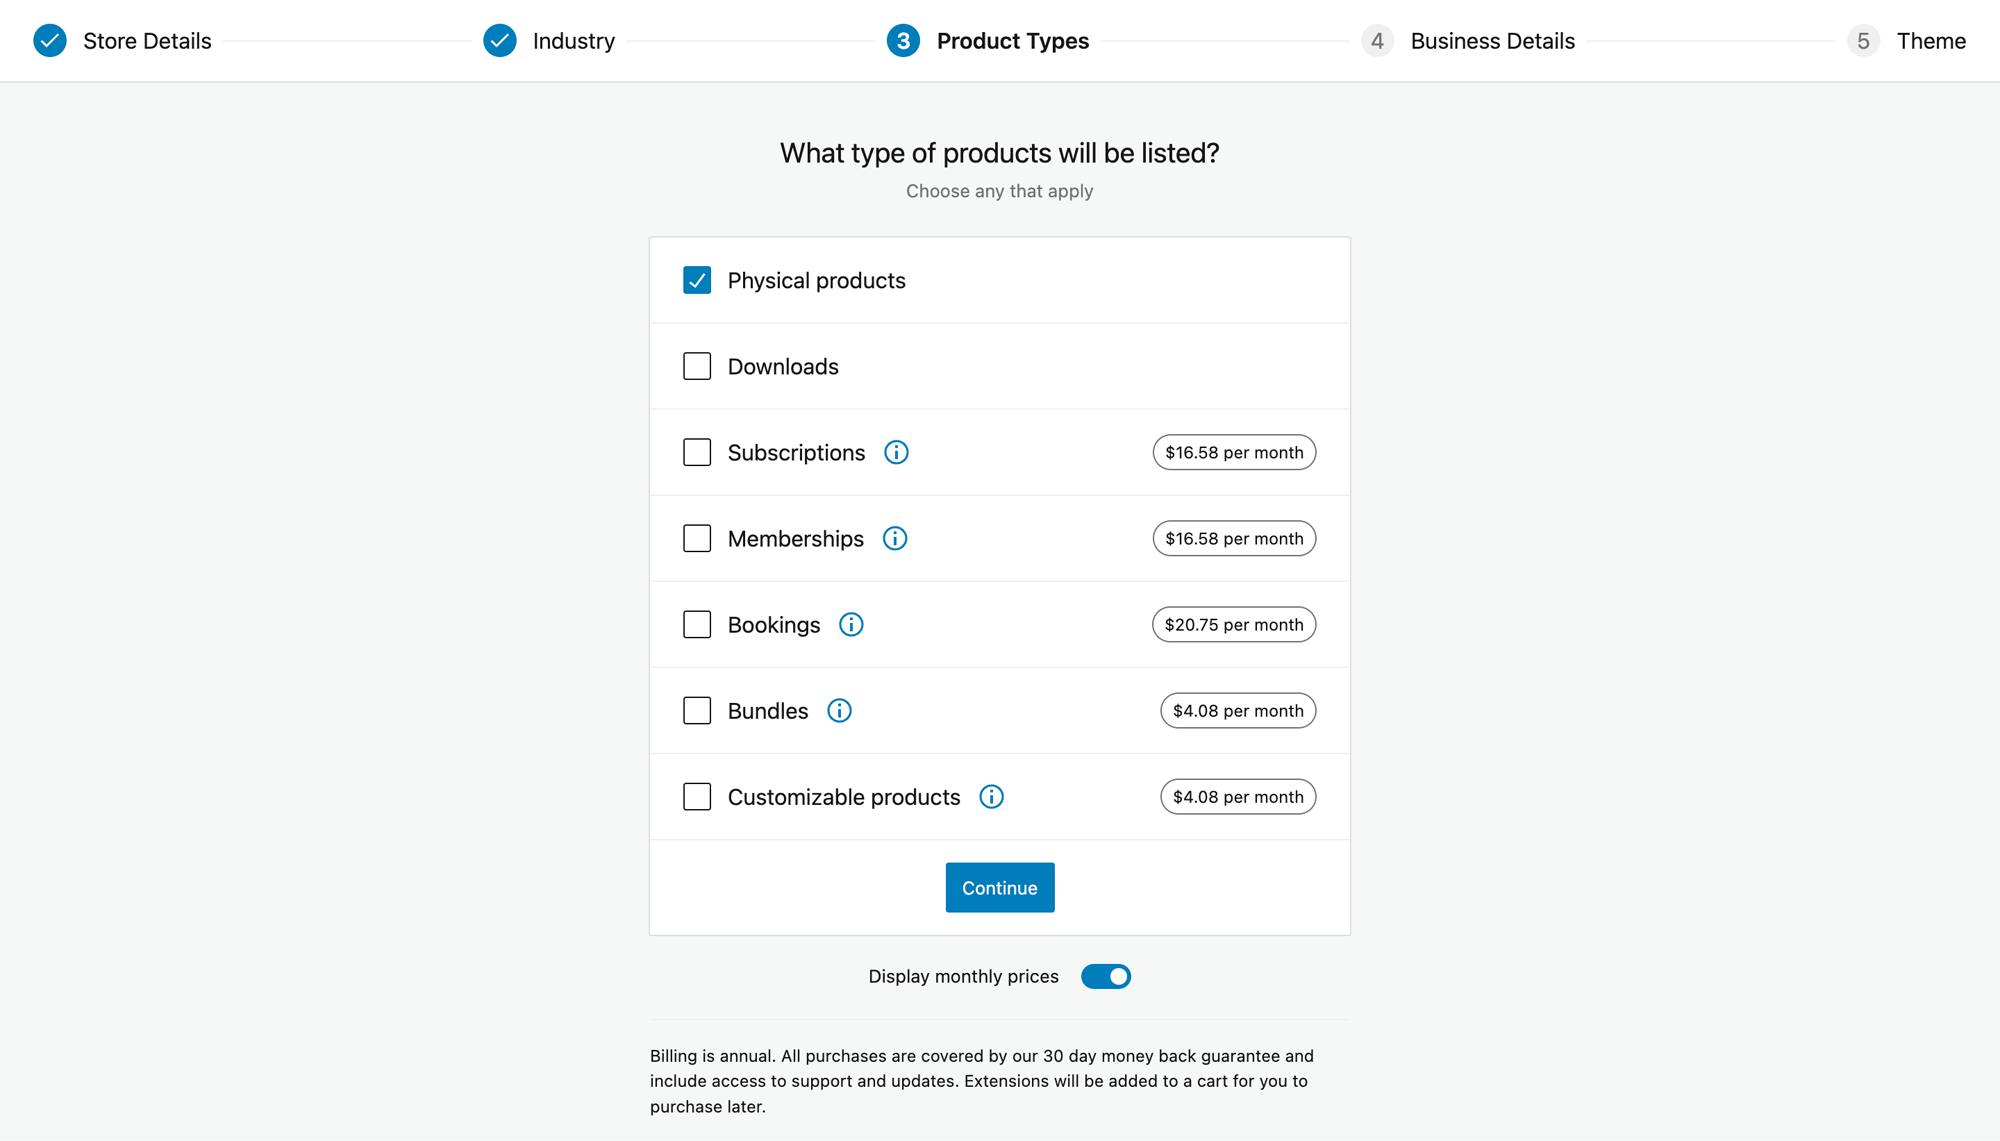
You can select one or multiple product types. Also, there is a toggle to change the prices to yearly or monthly on the bottom. Click Continue.
Business Details
This next step will ask for business details.

It mainly asks for how many products you’re planning to display and if there’s any other platform where you’re currently selling.
Check I'm setting up a store for a client if that’s what you’re doing.
Free Features
There is another tab in this step called Free features.
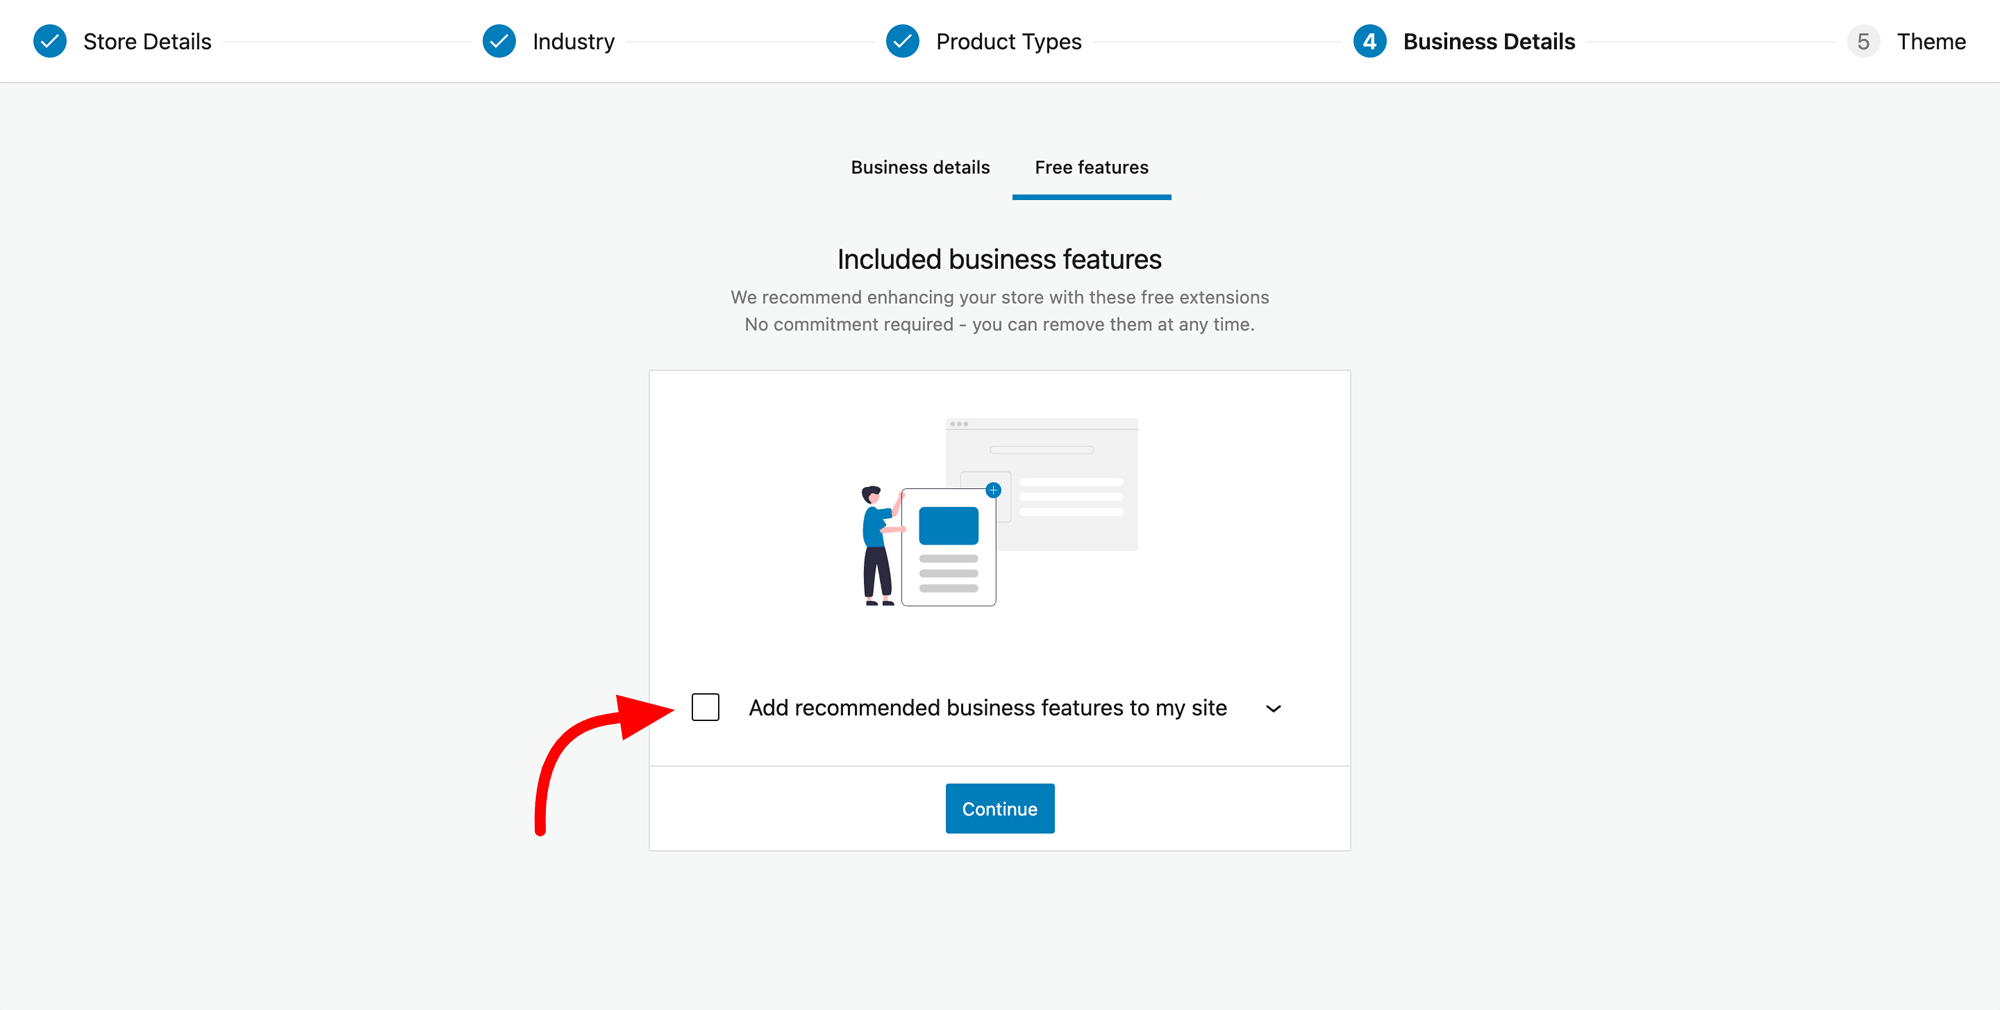
Click on it and uncheck Add recommended business features to my site
Click the Continue button.
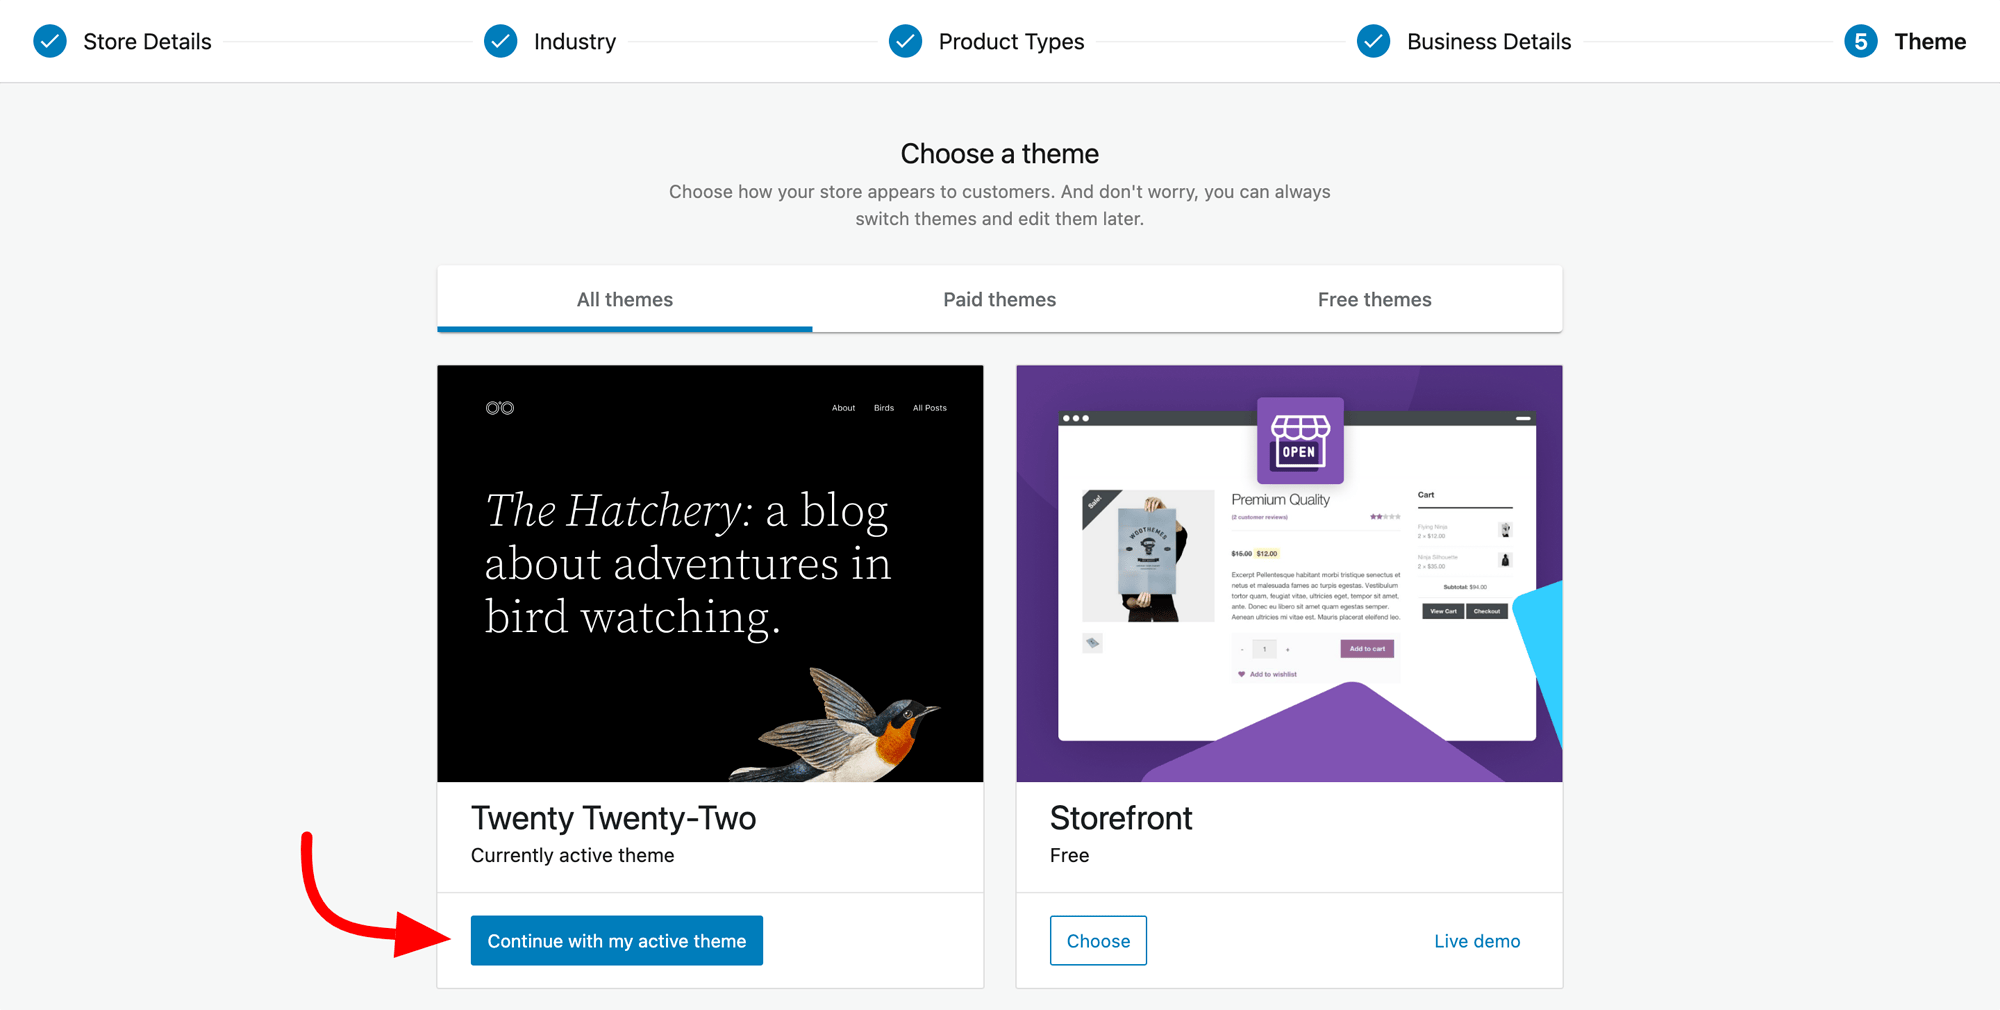
Theme
This last step will help you set up a theme for your store.
Click Continue with my active theme because we will customize theme-related settings in the upcoming steps.
It will automatically take you to your WordPress dashboard. The basic setup of your WooCommerce store is done.
It’s time to make essential changes manually so keep reading.
Step 4: Set up Payment Methods
It’s finally time to set up payments for your store. From the WooCommerce dashboard, click Set up payments.
It will show you a list of recommended payment methods like Stripe, RazorPay, and PayU that you can enable and configure.
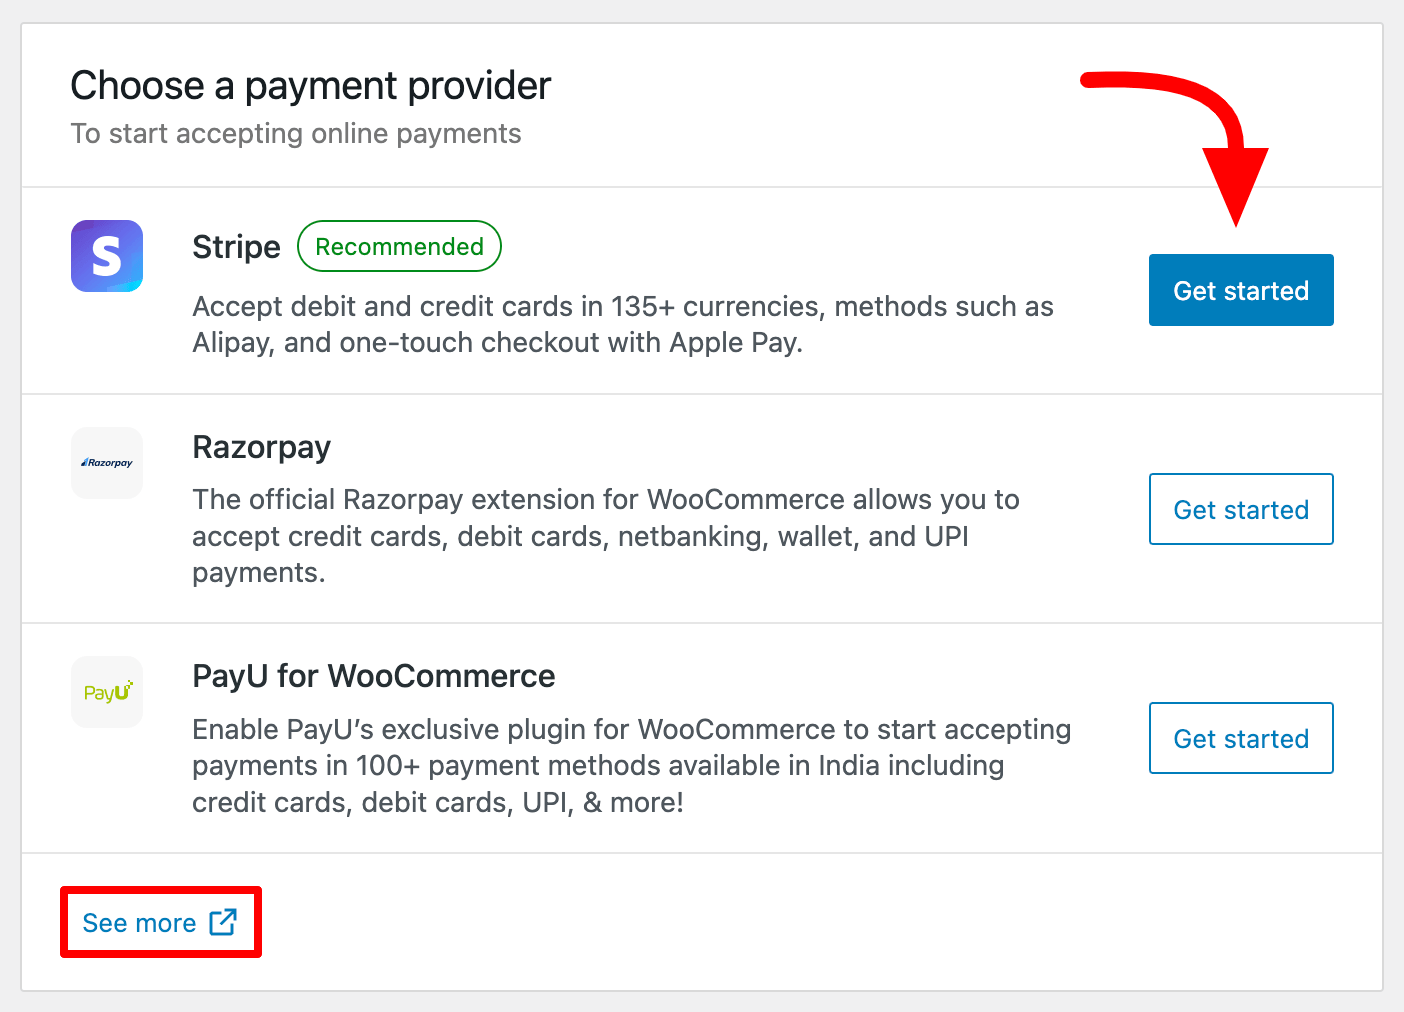
For each payment method, simply click Get Started, and WooCommerce will install the required plugin.
Keep following the steps shown to enable the payment method for your store.
You can add more payment methods by clicking the See more link on the payments page.
Step 5: Add Products to your WooCommerce Shop
It’s time to officially launch your eCommerce store!
To do this, you’ll need to add products, services, or downloads.
Head to your WordPress dashboard and click on Products » Add Product.
The first thing to fill out on this page is the Product name. Add a catchy title for your product.
Next, add a detailed description with proper formatting, headings, and thorough info.
In the right sidebar, add images in the Product image and Product gallery sections.
Don’t forget to select category and tags in the sidebar under the Product categories and Product tags section.
After that, scroll down, and you’ll see a Product data section where you’ll add all the necessary and relevant details related to your product, like inventory details, shipping info, attributes, etc.
And finally, there is a section called Product short description, where you have to add a really short description of the product which will show up when there are multiple products on the page.
Once you’re satisfied with all the filled details, click Publish to make your product live.
Below is a screenshot of the complete process:

Repeat the same process to add as many products as you want.
Step 6: Install and Customize a WordPress theme
As a business owner, you want your WooCommerce store to have a professional look that is also unique to your brand.
WordPress themes provide an easy way to give your store the right look. In fact, WordPress themes control how the product pages look.
So, choosing the right WordPress theme for your eCommerce store is the most crucial step.
There are countless free and paid themes available for WordPress. So, which one to choose?
One thing to keep in mind is that all WordPress themes are not fully optimized for WooCommerce.
It’s also important that the theme you choose has deep WooCommerce integration that allows customization of every aspect of the site without requiring design plugins or custom codes.
We use and recommend Astra. Want to know why? Here are the reasons why Astra is the best WooCommerce theme.
But in short, it’s a modern and elegant theme that comes packed with tons of features to power an eCommerce store without sacrificing the speed of the site a bit.
To install Astra, go to Appearance » Themes from your WordPress dashboard and click Add New.


Under the list of recommendations, Astra should show up. Hover over it and click the Install button and then Activate.
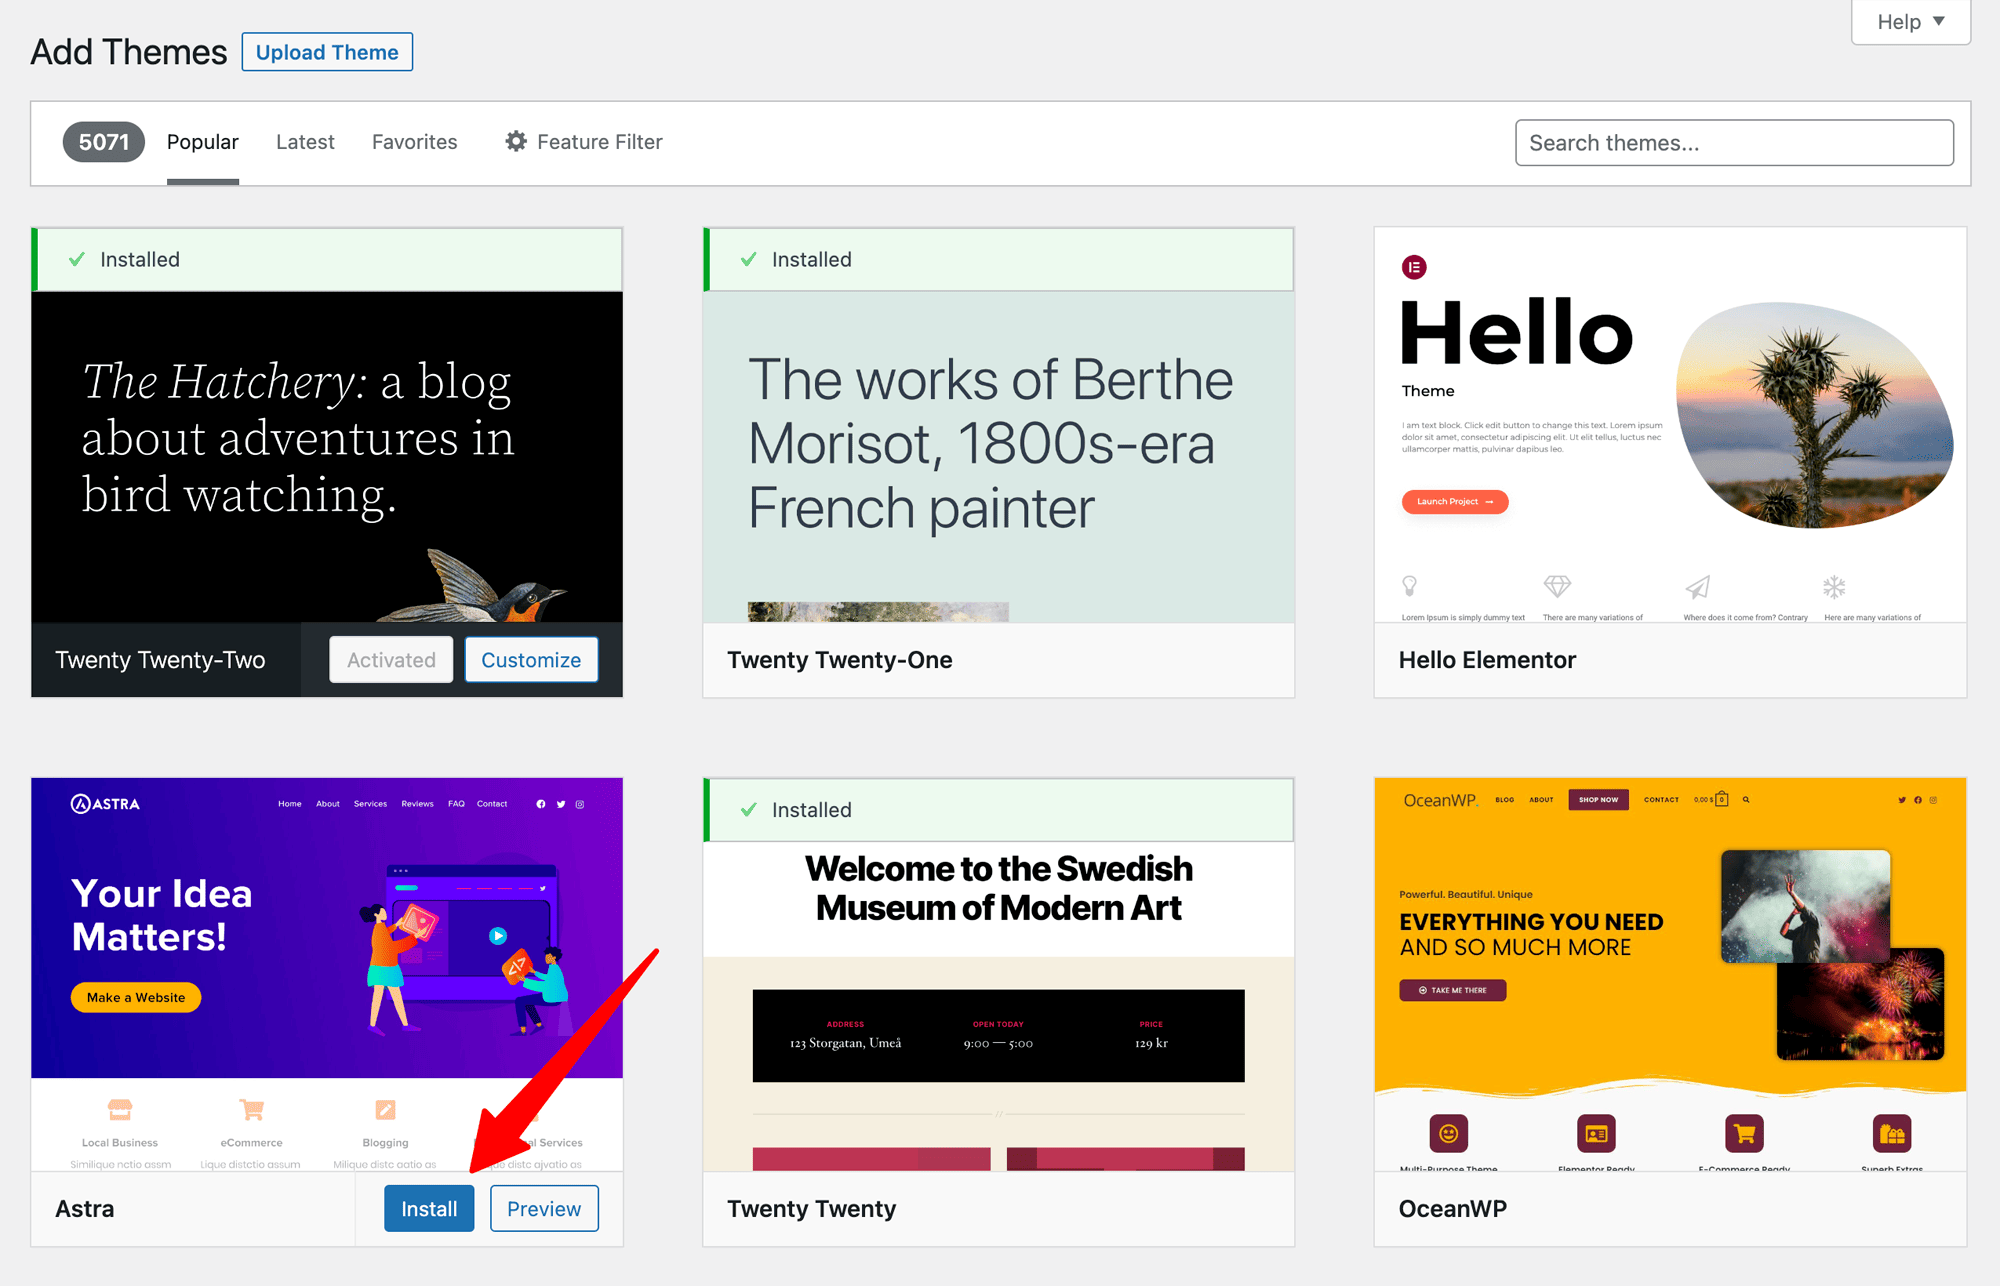
If it doesn’t show up there for some reason, search for astra in the search bar.
This will install the free version of the Astra theme. To unlock its full potential, you need to buy any of the Astra premium plans, which you can buy from here.
We have been using the Astra Growth Bundle and are completely satisfied with it.
Once the Astra premium add-on is installed and activated, you can activate the WooCommerce module by going to Appearance » Astra Options.
Customizing sites with Astra is super easy.
All you need to do is enable the available modules in Astra Options, which you can find by going to Appearance » Customize.
Header and Logo
The first thing you should do is set up the header of your site and upload a logo.
Add all the important links to the navigation bar like the contact and about us pages so that it’s easy for users and customers to reach out to you.
Customize the Layout
Now there are plenty of options to play around with to get the perfect layout for your shop.
You can change and add elements, modify the size of various areas, white spaces, and much more.
With Astra, possibilities are limitless!
Change Colors and Typography
Unlike other themes, Astra comes with in-built options to control your store’s colours and fonts.
You don’t need to install separate plugins for that.
From the Customizer, go to color and typography options.
You can set a global color palette and then apply it to the various elements of your shop.
This color scheme should compliment your brand.
The same goes for typography, you can use custom fonts or Google Fonts.
It’s easy to control the font attributes for each element on all the devices so that no matter which device the user is using to access your WooCommerce store, it will always look perfect.
And… done!
By following these steps, one can easily create, set up, and design an eCommerce store with WordPress in an hour or less.
After the basic setup, you should fine-tune all the settings like shipping, taxes, checkout page, etc. Add a plugin to show product recommendations to upsell your other products.
Make your store’s shopping experience seamless to improve user interaction so that customers keep coming back to place regular orders.
If you need any help related to any step, then feel free to drop your comments below.